Create connections to existing data sources
To use Data Guru, one of the first things you must do is establish connections to the external data sources you are using. Data sources can be either supported databases or supported file types. With each project, you typically also define a database connection as your workspace.
Most database types allow you to use your database credentials from User Preferences rather than entering the credentials as part of the connection definition. If you use this option, Data Guru will store the credentials and allow you to quickly connect to the database from any Data Guru project. Before you can use this option, you should to set up your credentials in User Preferences for the database connection type you are defining.
If you have installed Data Guru on a 64-bit machine, but plan on connecting to a 32-bit resource such as 32-bit Microsoft Access or a 32-bit ODBC data source, you must run Data Guru in 32-bit mode using DataGuru32.exe. To check if you are running Data Guru as a 32-bit or 64-bit program, select About from the Data Guru Help menu. The Processing as section of the dialog indicates whether Data Guru is running as a 32-bit or a 64-bit program. Data Guru automatically launches as either 32-bit or 64-bit based on the version of Microsoft Office installed and the operating system of the machine running Data Guru. If you would like to manually launch Data Guru as a 32-bit or 64-bit program, navigate to where Data Guru is stored. The default storage location is in the local disk under Program Files\CoupaData Guru.
The following table lists the database types supported by Data Guru, and the modes in which connections to these database types can be created:
| Connection | Read | Write | Workspace |
|
SQL Server |
X | X | X |
| Access | X | X | - |
| ODBC | X | X | - |
| SQLite | X | X | - |
- [Read]: Database Import, Select, Aggregation, and SQL import actions can be used to read data from these databases
- [Write]: Database Import, Select, Aggregation, SQL Import, and insert user data actions can be used to write data to these databases
- [Workspace]: A database used by Data Guru when transforming and blending data within a project
The following table lists the database types that are no longer supported by Data Guru. You can continue to create and use connections to these databases. However, Coupa will no longer provide support, fixes or updates for these connections:
| Connection | Read | Write | Workspace |
| Hive (ODBC) | X | - | - |
| IBM DB2 (ODBC) | X | X | - |
| Oracle | X | X | - |
| Oracle (ODBC) | X | X | - |
| PostgreSQL | X | X | X |
|
SAP Hana |
X | X | X |
| SAP Connection for specific actions |
X | X | |
|
Teradata |
X | X | X |
|
Teradata (ODBC) |
X | X | X |
To create a database connection, select Connections > New Database Connection from the menu bar, or click the New Database Connection icon from the ribbon or the Connections pane.
When you define a database connection, the information you provide depends on the database type.
For attachable databases (instances of a database that can be moved across servers), you can specify the file path for a user instance of the database; this allows you to access the database without having administrator privileges.
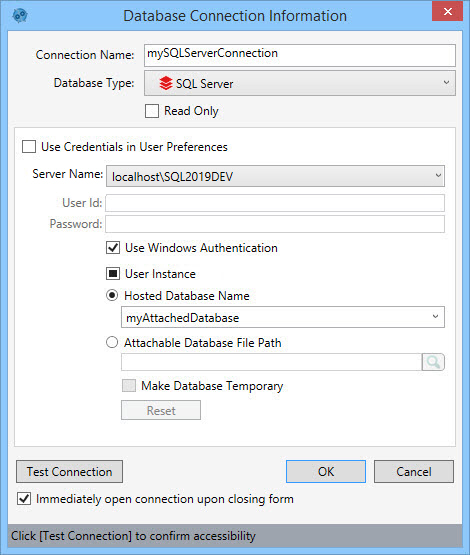
- Enter a Connection Name to identify the connection.
- Select the Database Type as SQL Server.
- Indicate whether the database is Read Only.
- Select Use Credentials in User Preferences, or enter the name of the SQL server instance (or a Data Guru parameters identifying the instance) as the Server Name.
- Provide the SQL Server User Id and Password if you are using SQL Server Authentication, or select Use Windows Authentication, depending on your organization’s security protocols.
- The User Instance checkbox can be set in one of three states -
 - Automatically determine which instance to use
 - Target the User Instance of the SQL Server installation
 - Target the Named Instance of the SQL Server installation
Make your selection by clicking on the checkbox until the appropriate state is indicated. - Select Hosted Database name and enter or select the name of a database (or a Data Guru parameters identifying the database) that is already attached to a SQL server instance, or select Attachable database file path and enter or browse for the path to a database (or a Data Guru parameters identifying the database) that will be attached/detached to/from a SQL Server instance by Data Guru.
- Often in a project, data is read from and/or written to external sources, and the workspace contains only interim tables which can take up a lot of space on disk. Additionally, multiple projects can consume large amounts of disk space. Select Make Database Temporary to use the disk space for the database only while the project is running, and then free up that space when the project is not running.
- Click Test Connection to verify your connection to the database.
- If you would like to open the connection when you close the dialog, click Immediately open connection upon closing form.

- Enter a Connection Name to identify the connection.
- Select the Database Type as Access.
- Indicate whether the database is Read Only.
- Enter the Database Path or use the browse button to find the Access database. Note that Data Guru defaults to the Databases folder to allow for easy access to files placed there.
- Click Test Connection to verify your connection to the database.
- If you would like to open the connection when you close the dialog, click Immediately open connection upon closing form.
Before you set up the connection, be sure to work with your support desk, IT, or database administrator to install the proper drivers on your machine, unless you already have an existing ODBC connection.
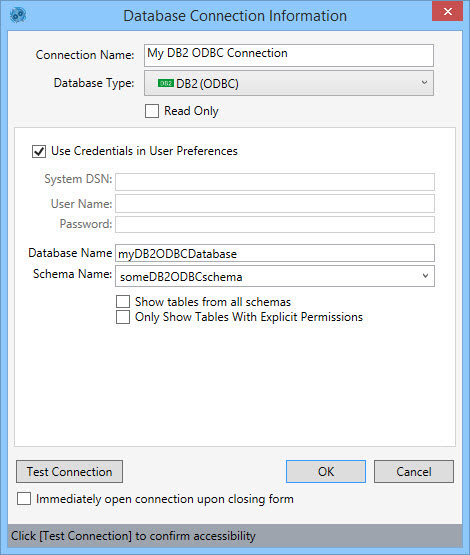
- Enter a Connection Name to identify the connection.
- Select the Database Type as DB2 ODBC.
- Indicate whether the database is Read Only.
- Select Use Credentials in User Preferences, or enter the System DSN (data store name), User Name, and Password for the database.
- Enter a Database Name, or select one from the list of databases for this connection if available.
- Select or enter the Schema Name.
- Select Only Show Tables With Explicit Permissions to limit the database tables shown in an action’s Connections pane to only those for which you have explicit permissions.
- When you open a connection to the database from the Connections pane, Data Guru displays a list of all tables for the schema identified in this connection configuration. Select Show tables from all schemas to include all tables across all schemas in the Connections pane.
- Click Test Connection to verify your connection to the database.
Before you set up the connection, be sure to work with your support desk, IT, or database administrator to install the proper drivers on your machine, unless you already have an existing ODBC connection.
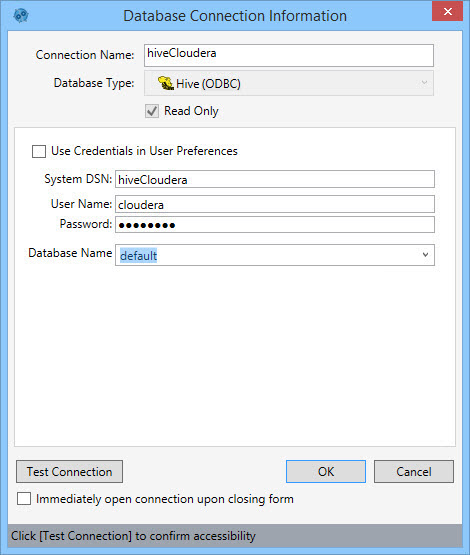
- Enter a Connection Name to identify the connection.
- Select the Database Type as Hive ODBC.
- Indicate whether the database is Read Only.
- Select Use Credentials in User Preferences, or enter the System DSN (data store name), User Name, and Password for the database.
- Select a Database Name from the list of available databases for this connection.
- Click Test Connection to verify your connection to the database.
Before you set up the connection, be sure to work with your support desk, IT, or database administrator to install the proper drivers on your machine, unless you already have an existing ODBC connection.
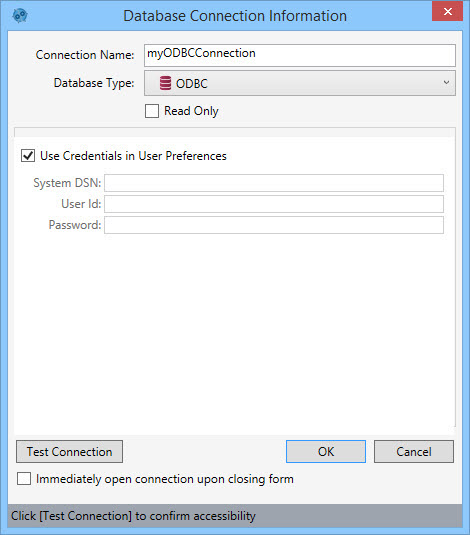
- Enter a Connection Name to identify the connection.
- Select the Database Type as ODBC.
- Indicate whether the database is Read Only.
- Select Use Credentials in User Preferences, or enter the System DSN (data store name), User Id, and Password for the database.
- Click Test Connection to verify your connection to the database.
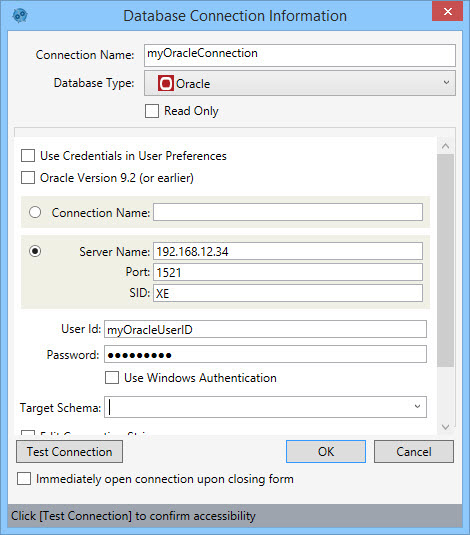
- Enter a Connection Name to identify the connection.
- Select the Database Type as Oracle.
- Indicate whether the database is Read Only.
- Select Oracle Version 9.2 (or earlier) if you are using this version of Oracle, or an earlier version. Note that this selection affects the default connection string.
- Enter your credentials. There are three options for doing this, depending on your organization’s security protocols:
- Select Use Credentials in User Preferences if your Oracle user credentials are stored in Data Guru's User Preferences.
- Enter your Oracle User Id and Password, as well as either the Connection Name (if you have the Oracle Client Tools configured) or the Server Name, Port, and SID for the Oracle database. Server Name can be the DNS name or the IP address of the Oracle server. One of the most common Oracle ports is 1521.
- Select Use Windows Authentication and enter either the Connection Name (if you have the Oracle Client Tools configured) or the Server Name, Port, and SID for the Oracle database. Server Name can be the DNS name or the IP address of the Oracle server. One of the most common Oracle ports is 1521.
- Choose or enter a Target Schema.
-
As you enter information into the fields, the appropriate connection string is built using the settings you specify -

To enable editing of this string, select Edit Connection String.
- Click Test Connection to verify your connection to the database.
- If you would like to open the connection to Oracle when you close the dialog, click Immediately open connection upon closing form.
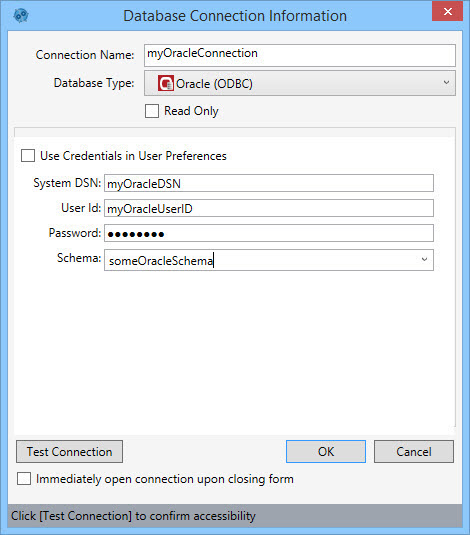
Before you set up the connection, be sure to work with your support desk, IT, or database administrator to install the proper drivers on your machine, unless you already have an existing ODBC connection.
- Enter a Connection Name to identify the connection.
- Select the Database Type as Oracle ODBC.
- Indicate whether the database is Read Only.
- Enter your credentials. There are two options for doing this, depending on your organization’s security protocols:
- Select Use Credentials in User Preferences if your Oracle user credentials are stored in Data Guru's User Preferences.
- Enter the System DSN (data store name), User Id, and Password for the Oracle database.
- Choose or enter a Schema.
- Click Test Connection to verify your connection to the database.
- If you would like to open the connection when you close the dialog, click Immediately open connection upon closing form.
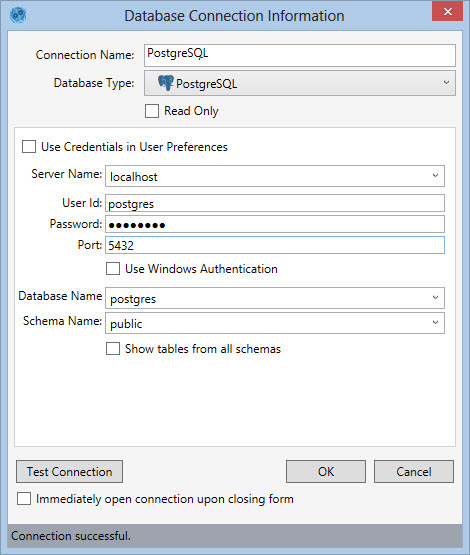
- Enter a Connection Name to identify the connection.
- Select the Database Type as PostgreSQL.
- Indicate whether the database is Read Only.
- Enter your credentials. There are three options for doing this, depending on your organization’s security protocols:
- Select Use Credentials in User Preferences if your PostgreSQL user credentials are stored in Data Guru's User Preferences.
- Enter your PostgreSQL User Id and Password.
- Select Use Windows Authentication.
- Enter the name of the PostgreSQL instance (or a Data Guru parameters identifying the instance) as the Server Name.
- Indicate the connection Port.
- Select or enter the Database Name and enter or select the name of a database that is already attached to a PostgreSQL instance.
- Select or enter the Schema Name.
- When you open a connection to the database from the Connections pane, Data Guru displays a list of all tables for the schema identified in this connection configuration. Select Show tables from all schemas to include all tables across all schemas in the Connections pane.
- Click Test Connection to verify your connection to the database.
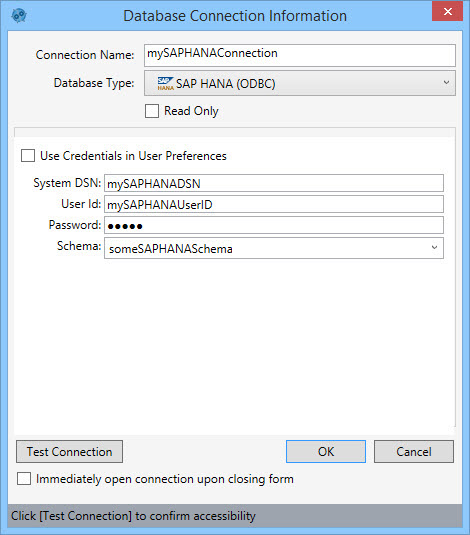
Before you set up the connection, be sure to work with your support desk, IT, or database administrator to install the proper drivers on your machine, unless you already have an existing ODBC connection.
- Enter a Connection Name to identify the connection.
- Select the Database Type as SAP HANA (ODBC).
- Indicate whether the database is Read Only.
- Enter the System DSN (data store name), and provide the User Id and Password.
- Select a Schema.
- Click Test Connection to verify your connection to the database.
- If you would like to open the connection when you close the dialog, click Immediately open connection upon closing form.
This database connection type is used to connect to a Supply Chain Guru SQL Server database. It verifies that the schema is that of a Supply Chain Guru model.
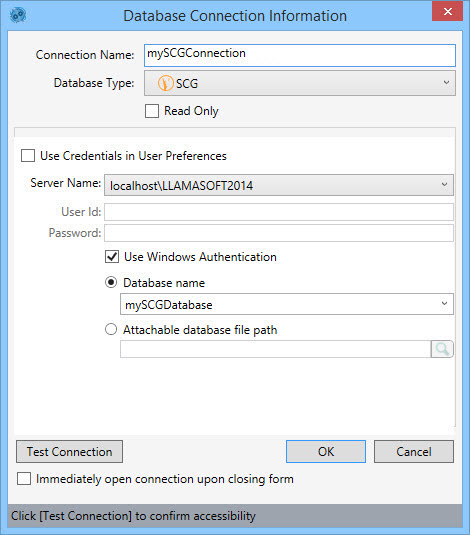
- Enter a Connection Name to identify the connection.
- Select the Database Type as SCG.
- Indicate whether the database is Read Only.
- Select Use Credentials in User Preferences, or enter the name of the SQL server instance as the Server Name.
- Enter your credentials. There are three options for doing this, depending on your organization’s security protocols:
- Select Use Credentials in User Preferences if your SQL Server user credentials are stored in Data Guru's User Preferences.
- Uncheck Use Windows Authentication, and enter your SQL Server Server Name, User Id, and Password if you are using SQL Server Authentication.
- With Use Windows Authentication selected, enter your your SQL Server Server Name.
- Select Database name and enter or select the name of a database that is already attached to a SQL server instance, or select Attachable database file path and enter or browse for the path to a database that will be attached/detached to/from a SQL Server instance by Data Guru.
- Click Test Connection to verify your connection to the database.
This database connection type is used to connect to a Supply Chain Guru X SQL Server database. It verifies that the schema is that of a Supply Chain Guru X model.

- Enter a Connection Name to identify the connection.
- Select the Database Type as SCGX.
- Indicate whether the database is Read Only.
- Enter your credentials. There are three options for doing this, depending on your organization’s security protocols:
- Select Use Credentials in User Preferences if your SQL Server user credentials are stored in Data Guru's User Preferences.
- Uncheck Use Windows Authentication, and enter your SQL Server Server Name, User Id, and Password if you are using SQL Server Authentication.
- With Use Windows Authentication selected, enter your your SQL Server Server Name.
- Select Database name and enter or select the name of a database that is already attached to a SQL server instance, or select Attachable database file path and enter or browse for the path to a database that will be attached/detached to/from a SQL Server instance by Data Guru.
- Click Test Connection to verify your connection to the database.
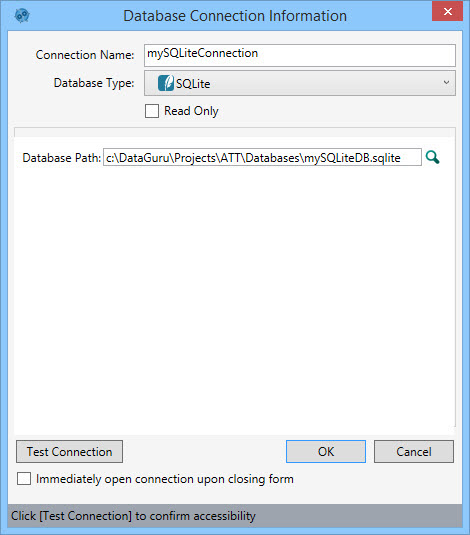
- Enter a Connection Name to identify the connection.
- Select the Database Type as SQLite.
- Indicate whether the database is Read Only.
- Enter or browse and select the Database Path.
- Click Test Connection to verify your connection to the database.
Before creating this type of database connection, you must edit the DataGuru.exe.config file to change the Service Address and Server Name that appear in the Database Connection Information Screen. Initially, the values are as shown in the following:
- Exit the Data Guru application.
- Go to the Data Guru install directory, and open the DataGuru.exe.config file using a text editor such as Notepad.
- Locate this section -
<method name="SetStringValue">
<param name="id" value="ScgCom_ServiceEndPoint" />
<param name="value" value="http://k2eqa-web.llamadev.local"/>
</method>
<method name="SetStringValue">
<param name="id" value="ScgCom_LocalServer" />
<param name="value" value="k2eqa-db.llamadev.local"/>
</method>
- Change http://k2eqa-web.llamadev.local to http://qa3-web.llamadev.local and k2eqa-db.llamadev.local to qa3-db.llamadev.local. When finished, it should look like this -
<method name="SetStringValue">
<param name="id" value="ScgCom_ServiceEndPoint" />
<param name="value" value="http://qa3-web.llamadev.local"/></method>
<method name="SetStringValue">
<param name="id" value="ScgCom_LocalServer" />
<param name="value" value="qa3-db.llamadev.local"/></method>
- Save the changes.
- Open the Data Guru application.
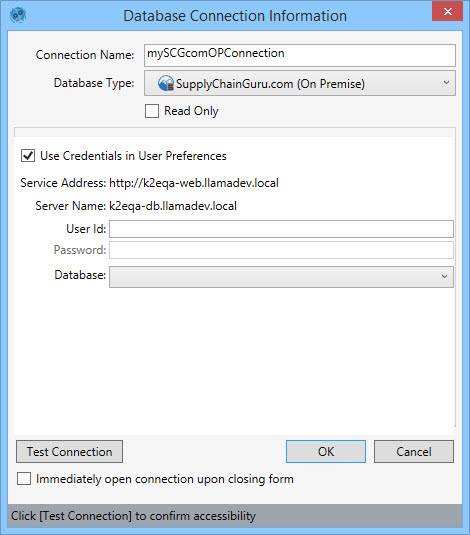
When you re-open the application, you can then create the database connection. On the Database Connection Information screen:
- Enter a Connection Name to identify the connection.
- Select the Database Type as SupplyChainGuru.com (On Premise).
Note that the Service Address and Server Name reflect the changes you made in the DataGuru.exe.config file.
- Indicate whether the database is Read Only.
- Select Use Credentials in User Preferences, or enter the Server Name, User Id, Password, and Database Name.
- Click Test Connection to verify your connection to the database.
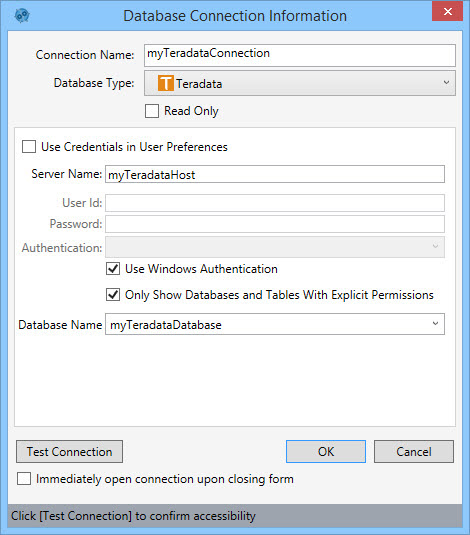
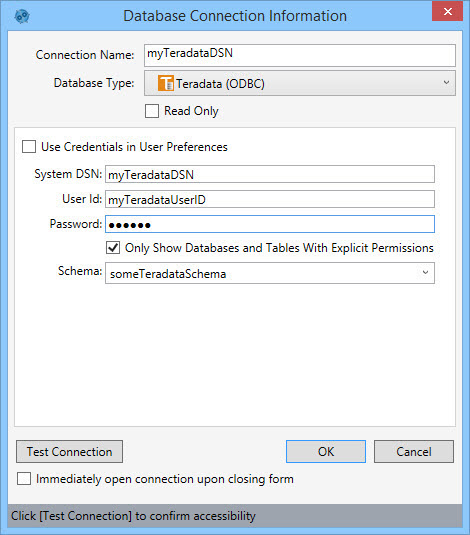
- Enter a Connection Name to identify the connection.
- Select the Database Type as Teradata.
- Indicate whether the database is Read Only.
- Enter your credentials. There are three options for doing this, depending on your organization’s security protocols:
- Select Use Credentials in User Preferences if your Teradata credentials are stored in Data Guru's User Preferences.
- Enter your Teradata User Id, and Password.
- Select Use Windows Authentication.
- Enter the Teradata Server Name. Server Name can be the DNS name or the IP address of the server.
- If you enter your Teradata credentials rather than using User Preferences or Windows Authentication, you can also choose an Authentication method for authenticating your credentials.
- Select Only Show Databases and Tables With Explicit Permissions to limit the schemas and tables shown in an action’s Connections pane to those for which you have explicit permissions.
- Select the Database Name.
- Click Test Connection to verify your connection to the database.
Before you set up the connection, be sure to work with your support desk, IT, or database administrator to install the proper drivers on your machine, unless you already have an existing ODBC connection.
- Enter a Connection Name to identify the connection.
- Select the Database Type as Teradata ODBC.
- Indicate whether the database is Read Only.
- Select Use Credentials in User Preferences, or enter the System DSN (data store name), User Id, and Password for the database.
- Select Only Show Databases and Tables With Explicit Permissions to limit the schemas and tables shown in an action’s Connections pane to those for which you have explicit permissions.
- Select a Schema.
- Click Test Connection to verify your connection to the database.
A delimited file connection establishes a .txt or .csv file as an external data source.
- Configure the connection to match the characteristics of the delimited file
- Change a field’s data type as needed
- Identify key fields, set auto-increment options
- Choose from a wide variety of date formats
You can create a delimited file connection in one of two ways:
- Automatically, using the drag and drop method
- Manually, using the Data Guru interface to specify the connection information
Drag and Drop Connection
- Locate the delimited file.
- Drag it to the Connections pane in Data Guru, and drop it in the pane.
Create Connection in Data Guru
- Select Connections > New Delimited File Connection from the menu bar, or click the New Delimited File Connection icon on the Connections pane.
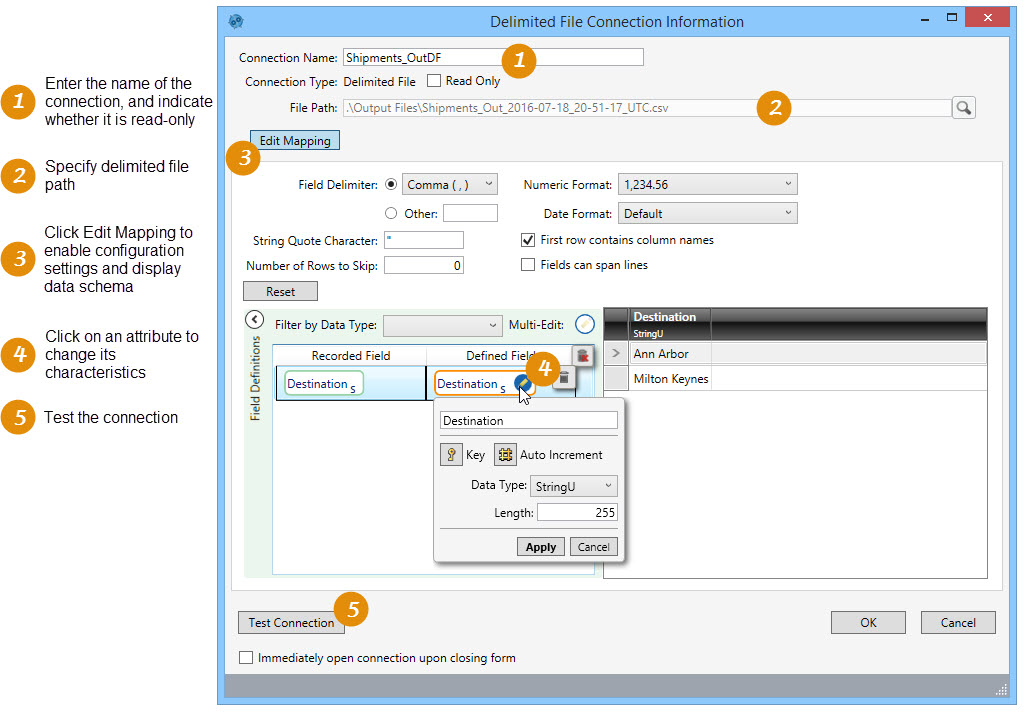
- Enter a File Path to the delimited file, or use the icon to the right of the field to locate the file. Data Guru defaults to the Input Files folder for your Data Guru project folder to allow for easy access to files placed in this directory. It is best practice to copy your files into this directory, or on a commonly accessible network drive.
- The Connection Name will default to the name of the file. Edit the Connection name, if necessary.
- If needed, click Read Only checkbox to indicate that the connection is read-only.
- Click Edit Mapping to enable editing of the connection’s data schema. When you click Edit Mapping, Data Guru analyzes the file to collect information such as number, names, and data types of columns in each worksheet.
- If necessary, change the settings in the Configuration area so the file is properly interpreted.
- In the Field Delimiter drop-down, select an alternate character that is used to separate fields, or select Other and specify a different character in the adjoining field.
- To start reading the data on a row other than the first row, enter the Number of Rows to Skip.
- Use the Numeric Format field to indicate the format of the numeric data in the delimited file, either US (1,234.56) or European (1.234,56). In Data Guru, the data is stored in US format.
- Use the Date Format field to indicate the format of date or date/time data in the delimited file, either US (1,234.56) or European (1.234,56). The default date format is the format currently being used on your computer.
- Indicate whether the First row contains column names.
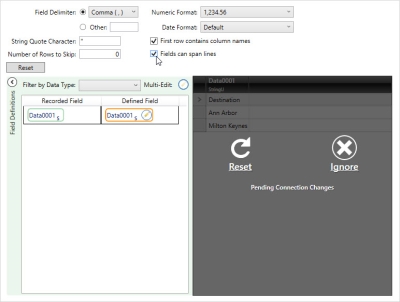
- Select Fields can span lines if you have carriage returns embedded in a field. Note that, for performance reasons, you should not check this field if you do not have embedded carriage returns.
- Enter the String Quote Character used for enclosing text strings.
- Note that you must reset the connection after making changes to any of these settings.
- Click Field Definitionsto view the data and edit the field definitions.
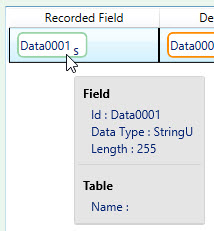
- To view the current properties of a field, hover over the field in the Recorded Field column.
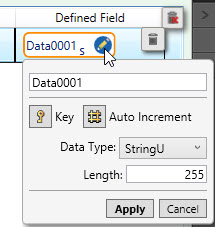
- To change the properties of a field, click on its Edit symbol in the Defined Field column.
- To change the data type of multiple columns at once, use Ctrl+click or Shift+click to select the fields you want to change. Click the Multi-Edit symbol to adjust the data type of all selected fields.
- Use Reset to return the field properties to their original mapped settings.
- To view the current properties of a field, hover over the field in the Recorded Field column.
- Click Test Connection to verify your connection to the delimited file.

An Excel Spreadsheet connection establishes a Microsoft Excel file containing one or more worksheets as an external data source. If named ranges are included in the Excel file, they can be imported in the same manner.

- Configure the connection to match the characteristics of each object (worksheet or named range)
- Choose the objects to be included in the connection
- Change a field’s data type as needed
- Identify key fields, set auto-increment options
- Choose from a wide variety of date formats
You can create an Excel Spreadsheet connection in one of two ways:
- Automatically, using the drag and drop method
- Manually, using the Data Guru interface to specify the connection information
Drag and drop connection
- Locate the Excel file.
- Drag it to the Connections pane in Data Guru, and drop it in the pane.
Create connection in Data Guru
- Select Connections > New Excel Spreadsheet Connection from the menu bar, or click the New Excel Spreadsheet Connection icon on the Connections pane.
- Enter a File Path to the Excel file, or use the browse icon to the right of the field to locate the file. Data Guru defaults to the Input Files folder for your Data Guru project folder to allow for easy access to files placed in this directory. It is best practice to copy your files into this directory, or on a commonly accessible network drive.
- The Connection Name will default to the name of the Excel file. Edit the Connection name, if necessary.
- If needed, click the Read Only checkbox to indicate that the connection is read-only.
- Click Edit Mapping to enable editing of the connection’s data schema. When you click Edit Mapping, Data Guru analyzes the file to collect information such as number, names, and data types of columns in each worksheet.
- The Excel Objects area lists worksheets with a green icon, and named ranges with a purple icon.
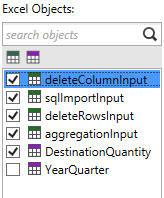
Objects to be included in the connection are identified by a checkmark appearing next to the object. By default, the schema of the first object in the list is displayed.
- If necessary, change the configuration settings for the selected worksheet or named range.
- Indicate whether the First row contains column headers for all tables.
- To start reading the data on a row other than the first row, enter the Number of Rows to Skip.
- Use the Numeric Format field to indicate the format of the numeric data in the worksheet or named range, either US (1,234.56) or European (1.234,56). In Data Guru, the data is stored in US format.
- Use the Date Format field to indicate the format of date or date/time data in the worksheet or named range, either US (1,234.56) or European (1.234,56). The default date format is the format currently being used on your computer.
- Note that you must reset the connection after making changes to any of these settings. Refer to File Connection Awareness for additional information.
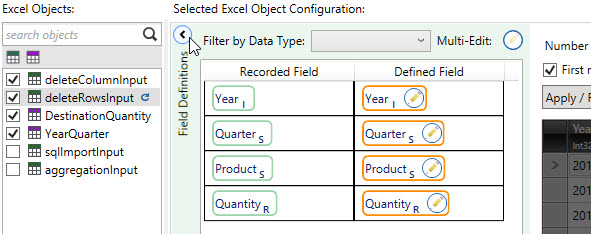
- To edit the field definitions, expand the Field Definitions area.

- To view the current properties of the field, hover over the field in the Recorded Field column.

- To change the properties of a field, click on its Edit symbol in the Defined Field column.
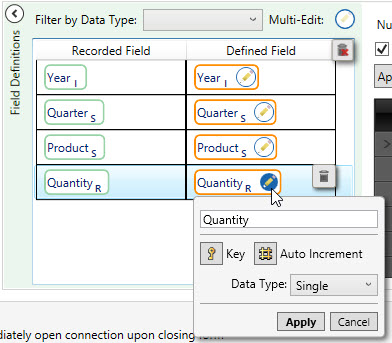
To change the data type of multiple columns at once, use Ctrl+click or Shift+click to select the fields you want to change. Click the Multi-Edit symbol to adjust the data type of all selected fields.
- Use Reset All to return the field properties and configuration changes to their original settings.
- Click Test Connection to verify your connection to the Excel file.
To display the schema of a different object, highlight the name in the list. Note that you cannot edit the schema of an object unless it has been checked for inclusion in the connection; if you check an unchecked object, its schema is automatically displayed and can be edited
Change the data schema
Once an Excel connection has been defined, you can make changes to the connection’s definition, including the name and location of the file. However, if you make changes to the schema, either in the Excel file you are currently using or by changing to another Excel file with a different schema, the connection and all tables affected by the change are identified by a warning icon in the Connections pane.
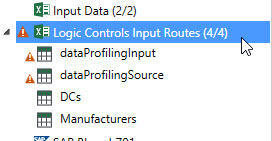
This warning is an indication that you must manually address the schema discrepancies detected as the result of your change.
SAP ERP includes several modules with utilities for production and inventory control. SAP ERP collects and combines data from these modules for enterprise resource planning.
Suppose your SAP system connection parameters are defined as the following:
- Application Server - cpcf501
- System Number - 5
- System ID - 800
- SAProuter String - /H/155.56.59.11
To create a SAP connection, select Connections > New SAP Connection from the menu bar, or click the New SAP Connection icon on the Connections pane.
Connection definition
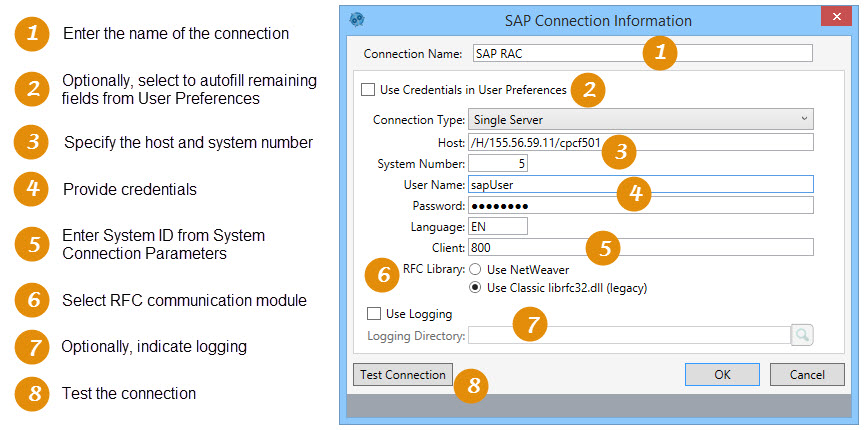
- Enter a Connection Name.
- Enter your credentials. Either click Use Credentials in User Preferences to autofill most of the remaining settings based on your settings in User Preferences, or enter them manually:
- Select whether your connection will be to a specific server (Single Server) or to a load balancer that distributes incoming requests to an available server (Load Balancing).
- To specify the Host, enter your SAProuter String appended with the name of your Application Server, as specified in your SAP system connection parameters. In our example, enter /H/155.56.59.11/H/cpcf501.
- Specify the System Number provided by SAP with your license, which in this example is 5.
- Enter a User Name and Password.
- For Client, enter the System ID from your system connection parameters, which in this example is 800.
- Choose the RFC Library module to be used.
- Use NetWeaver - Uses Netweaver's more recent sapnwrfc.dll and related modules to communicate with SAP. This selection is the default for newly configured connections.
- Use Classic librfc32.dll (legacy) - Uses the classic librfc32.dll to communicate with SAP. While SAP has ended support for this option, it is provided in Data Guru for backward compatibility with existing connections configured prior to Release 4.0, and those connections will have this option selected by default.
To use the NetWeaver option, you must make the SAP communication modules available on your desktop, which typically must be obtained from your SAP administrator. Refer to the installation instructions in the Data Guru Release Notes for SAP prerequisites. - Optionally, select Use Logging, and use the search icon to identify the logging directory.
- Click Test Connection to verify your SAP connection.
Data Services provides access to supply chain information to help fill in supply chain model gaps and evaluate future network scenarios. If your company has a Data Services subscription, you can set up a connection between Data Guru and Data Services to pull in truckload and LTL rates. A Data Services connection allows you to look up transportation rate information or access the Data Cube from Coupa’s Data Services.
Data Cube is being replaced by Trend Cloud. For this release, you cannot create a new Data Cube connection. See What's new for more information.
To create a Data Services connection, select Connections > New Data Services Connection from the menu bar, or click the New Data Services Connection icon on the Connections pane.
Connection definition
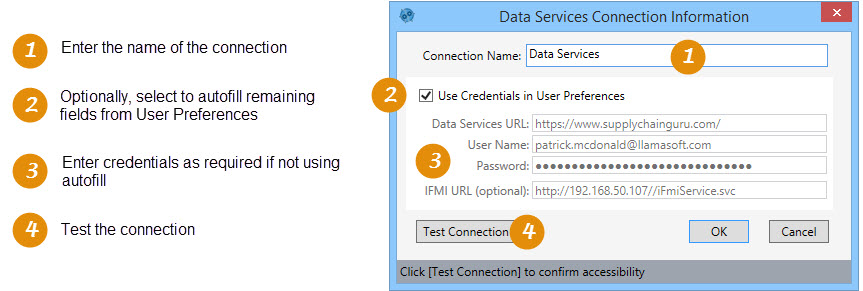
- Enter a Connection Name.
- Optionally, click Use Credentials in User Preferences to autofill the remaining settings based on your settings in User Preferences, or enter them manually.
- Enter the Data Services URL.
- Enter your User Name and Password for Data Services.
- Optionally, enter the IFMI URL for the IFMI Service.
- Click Test Connection to verify your connection to Data Services.
A Supply Chain Guru Cloud connection allows you to transfer model and database tables between the desktop and the appropriate cloud environment. For example, you can upload a Supply Chain Guru X model and then solve it using Modeler. You can also use this connection to download model and database tables.
To create a Supply Chain Guru Cloud connection, select Connections > New Supply Chain Guru Cloud Connection from the menu bar, or click the New Supply Chain Guru Cloud Connection icon on the Connections pane.

- Enter a Connection Name.
- Choose the Connection Type, which selects the cloud solving environment supporting the model type using this connection.
- Use Coupa Supply Chain for Supply Chain Guru X models.
- Use SupplyChainGuru.com for Supply Chain Guru 8.x models.
- Optionally, click Use Credentials in User Preferences to autofill the remaining settings based on your settings in User Preferences, or enter them manually.
- Add the remaining settings, which are displayed based on your selected connection type.
For Supply Chain -
- Specify the URL used to access Supply Chain; for example, enter https://us.llama.ai for Supply Chain Guru X models.
- Enter the API Key provided by Coupa.
- Click Login to verify your connection to Supply Chain. If you have not already logged into the platform, a browser tab is opened for platform log in.
- Enter your User Name.
- Click Next, then enter your password and click OK.
Once your credentials are verified, you are signed into Supply Chain. A browser page is displayed confirming the successful sign in. You can close the window and return to Data Guru.
If you are already signed into the platform, you will not have to enter your credentials. If you are not already signed in, enter your credentials to sign in for both Data Guru and the platform. Signing out from Data Guru signs you out of both the desktop and platform products.
A Geodata connection allows you to access one of several geodata services, which are used by Data Guru’s Geocoding and Distance Calculation transforms. The connection enables the translation of geographic data into latitude and longitude coordinates for use in the calculation of distances between two points.
To create a Geodata connection, select Connections > New Geodata Connection from the menu bar, or click the New Geodata Connection icon on the Connections pane.
Connection definition
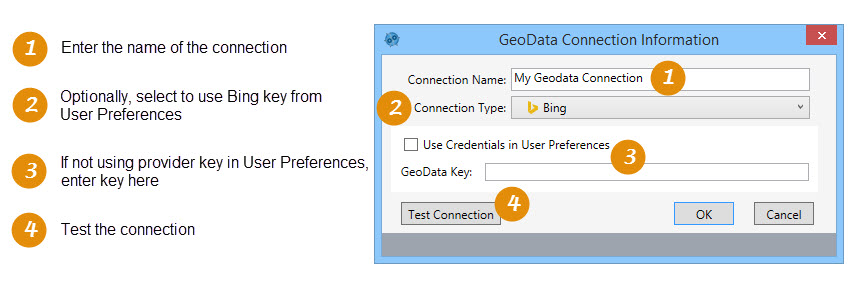
- Enter a Connection Name.
- For Connection Type, select the geodata provider.
- Baidu can be used for Geocoding and Distance Calculation transforms specifically for sites in China.
- PTV can also be used for Geocoding and Distance Calculation transforms.
- Bing can be used for Geocoding and Distance Calculation transforms.
- Naver can be used to geocode locations specifically in South Korea.
- MapBox can be used with the Geocoding and Distance Calculation actions. A complimentary Mapbox key is provided with Supply Chain Guru.
- Optionally, click Use Credentials in User Preferences to autofill the Geodata Key field based on your setting in User Preferences for the provider selected in the Connection Type field; otherwise, enter a valid key in the field.
- Click Test Connection to verify that your connection is working properly.
- Click OK.
Last modified: Thursday December 19, 2024