Creating a data fork
The Data Fork ![]() action allows you to divide input table records into two new record sets that can be written to new or existing tables, based on a filter and/or a user defined lookup on another table. The records that match the filter criteria enter the “Match” table, all other records are sent to the “Non-Match” table. You can:
action allows you to divide input table records into two new record sets that can be written to new or existing tables, based on a filter and/or a user defined lookup on another table. The records that match the filter criteria enter the “Match” table, all other records are sent to the “Non-Match” table. You can:
- Create a match table, or non-match table, or both
- When using an existing table as the output, use field mapping to map output fields to the existing table structures
- Define a filter and how to pass records based on the filter
- Use table mapping to define a lookup table and the relationship
- Configure record matching options that define how the lookup table determines which records are passed to the match or non-match tables
- Combine logic from the filter and record matching options using And/Or logic

On the Configuration tab:
-
If using a lookup table, create the field mappings.
-
Select the pass criteria based on the table mapping.
-
Drag Table Fields to define a filter, or use the Expression Editor.
-
If using both table mapping and a filter, select how to determine results based on the criteria being applied.
-
Preview data from pass or fail table, and the SQL statement.
Possible applications include:
- Separate records in a table into a pass table and a fail table
- Separate records where values are present in one table, but not found (or also found) in another table
- Separate records where values are present in one table, but not found (or also found) in another table, and (or) the records pass a filter
Separate table records into two tables
- Drag the Data Fork icon onto the design surface.
-
On the Connections tab
 , enter a Name and a Description to identify the action, then specify the input and output options for the data fork:
Input -
- For Database Connection, select the database from which the table originates, or choose New Database Connection to establish a new connection to another database.
- For Input Table Name, select the table containing the data.
- For Lookup Table Name, you can optionally choose one or more lookup tables to further refine the criteria for the pass/fail tables.
Output -
- The Database Connection reflects the database to which the table is being imported.
- Enter or select a Pass Table Name and a Fail Table Name depending on the Output Mode you choose -
- For Create/overwrite a table, enter the name of the table being created or overwritten. Using this mode, you can also choose to -
- Add a new _autokey field to the table, with incremented values that make each table row unique. This is required by some database types.
- Indicate that the table should be deleted after the macro or workflow has executed.
Note that these options affect all output tables for this action.
- For Use an existing table, select the table to be used from the drop-down, and indicate whether the rows in the table should be deleted before the new data is written to the table.
- For Create/overwrite a table, enter the name of the table being created or overwritten. Using this mode, you can also choose to -
- On the Configuration tab
 :
:
- Use the Filter area to build an expression that identifies records with specific values for selected fields. Expressions can be created directly in the Filter area, or you can use the Expression Editor.
- Select the Pass records option –
- Matching the filter – Only those records that match the filter are passed.
- Not matching the filter – Only those records that do not match the filter are passed.
- If you are using lookup tables as additional criteria for determining if rows should be passed or failed, create the necessary field relationship(s) between the target and lookup tables in the Table Mapping area. Drag from a field in the Target table, which contains the rows to be considered, to a field in the Lookup table, which contains rows to be searched. Repeat for all fields being mapped between the two tables, and for additional lookup tables.
Once the fields are mapped, use the statement in Record Matching Options to indicate how the mapping determines whether records are passed or failed.
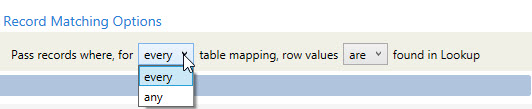
- Choose between any table mapping and every table mapping. In this case, any means a minimum of 1, and every means all.
- Choose whether row values are or are not found in the lookup table(s).
For example, suppose your selections result in the following statement -
“Pass records where, for every table mapping, row values are found in Lookup.”
In this case, if values are found in the mapped field of every row, then pass the records.
- If you are including a lookup, use the options available in Combine Logic to determine how the filter and the lookup criteria are to be used together. You can select And or Or. The choice you make here is reflected in the Configuration Options Summary.

- Records that match the filter (and lookup if specified) are written to the pass table, and non-matching records are written to the fail table.
- Click Preview to display the following –
- Pass Data – Arrange the columns of the pass data, view the Last SQL error, and set the Grid Maximum. Click Refresh to redisplay the data; you can also select Enable auto refresh to refresh the screen following each change to the pass criteria.
- Fail Data – Arrange the columns of the fail data, view the Last SQL error, and set the Grid Maximum. Click Refresh to redisplay the data; you can also select Enable auto refresh to refresh the screen following each change to the pass criteria.
- SQL – View the SQL statements created from the action.
- On the Mapping tab
 , map the output fields to separate matching and non-matching output tables when using existing tables for the output. Refer to Field Mapping for more information.
 - If the Performance tab
 is enabled in User Preferences, you can optionally change certain execution settings specific to this action. Refer to Change general preferences for additional information.
Data Fork data example
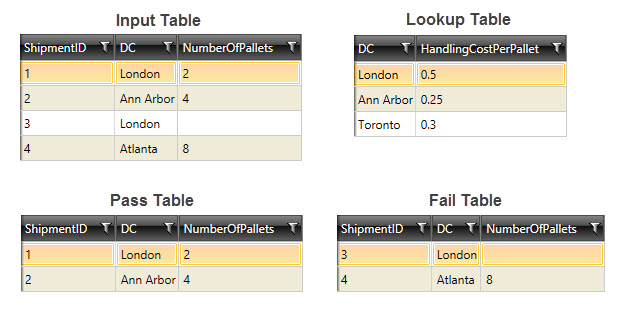
In the following example, use a lookup table to separate valid shipment records from invalid shipment records:
Last modified: Thursday December 19, 2024