Change general preferences
These settings allow you to customize your table and design surface options.
Use these settings to determine how table data is displayed.
- Default Field Sort Order - Select Database Default to use the default order in which the database is sorted, or select Alphabetical to sort the fields in ascending alphabetic order.
- Grid Display Row Limit - Enter the default maximum number of rows to be included in the display of data tables or files at any time. If the number of rows exceeds the screen size, a vertical scroll bar enables you to scroll through the rows up to the defined limit, and additional rows appear on successive pages. Note that a higher limit can affect response time.
- Show refresh prompt when data grids are out of date - Indicate whether to display a flag, in the form of an asterisk, next to the name of any table that is open while an action is run that outputs to that table.
- Show NULL indicator in data grids - Indicate whether to identify NULL grid cells and distinguish them from cells that are empty or blank.
- Show Confirm prompt when deleting items from Action pane - Indicate whether to require confirmation before deleting an item from the Action pane.
Use these settings to control the design surface behavior. This makes it easier to organize actions on the design surface.
- Enable Snap to Grid - Select to activate the Snap to Grid feature. Objects are gently guided along horizontal and vertical grid lines you cross while dragging. You can easily place them at intersection points or on a grid line to arrange them in the most efficient manner.
- Show Snap Grid - Select to enable the display of the snap grid, which is represented by small dots at each set of intersecting horizontal and vertical lines.
- Snap Grid Size - Specify the size of the grid squares, which are represented in pixels when zoomed to 100%. The smaller the size, the closer together you can place objects on the design surface.
Snap to Grid affects only those objects that are moved while it is enabled; it does not reposition objects that are already on the design surface and not moved.
Use these settings to control the amount and level of logging during execution.
- Execution Logging Level - Choose between Low and High, or select Disabled for no logging.
- Number of executions to be logged - Indicate how many executions should be included.
- Age of the oldest execution set in days - Indicate how many days to keep an execution set.
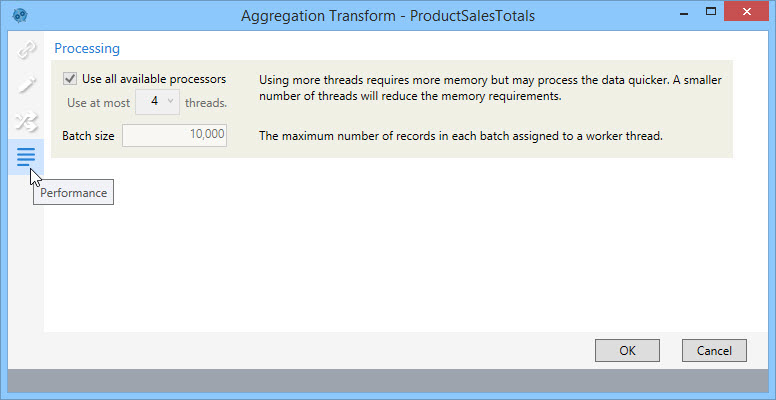
Provides settings that enable additional performance functionality.
- Show Performance Tab in Action Configuration - Select to enable an additional tab on selected actions that allows you to adjust performance-related settings. The following import and transform actions include this tab:
- Database Import
- Delimited File Import
- Excel Spreadsheet Import
- Excel Multi-sheet Import
- SAP BEx Import
- SQL Import
- Aggregation Transform
- Data Fork Transform
- Select Transform
- Unpivot Transform
- Weighted Average Transform
When enabled, the tab appears with the other tabs for that action, as in the following Aggregation transform.

On the Performance tab, specific options can vary depending on the action. For example, while most transforms and import actions include performance options for thread count and batch size limits (as shown in the previous example), the options available for Delimited File Export and Excel Spreadsheet Import also allow you to also set failure thresholds.

- Show Macro Preview in Workflow - When you hover over a workflow or macro in the Actions pane, the workflow or macro contents are displayed in a preview window -
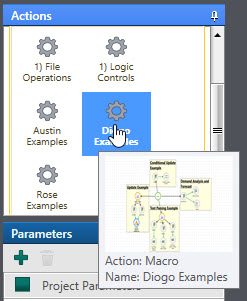
Select this choice to enable display of the preview window when hovering over a macro in an open workflow on the design surface, and then use one of the Preview Size choices to specify the size of the window.
Sizes include -
- Thumbnail
- Small
- Medium
- Large
- Ready Connections - Typically, when a user opens a macro, Data Guru attempts to "ready" the necessary connections (open them with an appropriately long timeout) for faster performance when configuring/executing actions. However, when a connection is not available, the full command timeout must expire for each connection before the macro or workflow opens, which can take a significant amount of time.Use this option to enable or disable this behavior.

Last modified: Thursday December 19, 2024