Updating field values using expressions
The Update ![]() action allows you to set the value of new or existing fields by using calculated expressions in a target table. You can:
action allows you to set the value of new or existing fields by using calculated expressions in a target table. You can:
- Use table mapping to define the relationships and keys between the target table and lookup tables
- Use filters to limit the records to which the action applies
- Use the Expression Editor to define the value of new or existing fields

On the Configuration tab:
-
Create mappings between lookup and target tables.
-
Filter the Table Field by table, or use a search string to find matching fields.
-
Create a filter to limit affected records.
-
Build expressions using color-coded lookup Table Fields.
-
Define the Target from color-coded target Table Fields, or use New Field to defin the Target.
-
Preview data or SQL statement.
Possible applications include:
- Lookup a value from a master table to populate a target table
- Calculate the value of new or existing fields by using functions and expressions
- Update the value of one or more fields for a subset of records
Update a field using a calculated expression
- Drag the Update icon onto the design surface.
- On the Connections icon
 , enter a Name and a Description to identify this action, then select the database and tables:
Target -
- For Database Connection, select the database in which the records are being updated, or choose New Database Connection to establish a new connection.
- For Table Name, select the table which receives the updated records.
Input (Optional) -
- If you are using one or more lookup tables for the update, use the Table Name list to select the table(s). To remove a table from the list, highlight the table name, and click the Remove icon
 .
.
- On the Configuration tab
 :
:- Use the Table Mapping area to build relationships between the target and lookup tables. Refer to Table Mapping using joins for additional information.
- Specify at least one expression/target pair -
- Indicate a target field by dragging it from Table Fields to the Target area on the right side of the screen.
- You can only choose from among the target table fields, which are easily identified by an orange bar appearing before the name, or you can choose a New Field.
- Click the Edit icon
 next to the target field’s name to optionally seed/reseed the new field with a default value, and to edit its name in the results.
- Create an expression for the target field using any of the fields identified in Table Fields. Expressions can be created directly in the expression area, or you can use the Expression Editor.
- Use the arrow
 between the expression and Target to adjust the display length of the two fields; to do this, hover over the arrow, then drag right or left to adjust the length. As one field display lengthens, the other field display shortens.
- Indicate a target field by dragging it from Table Fields to the Target area on the right side of the screen.
- In the Filter area, create an expression to more narrowly define the records considered for the update. Expressions can be created directly in the Filter area, or you can use the Expression Editor.
- Click Preview to view the data or the SQL statement created from this action. Refer to Preview for information.
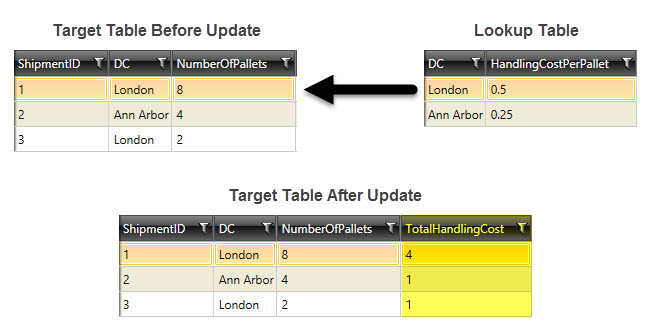
Update data example
The following example shows the effects of an update made using a lookup table
Last modified: Thursday December 19, 2024