Importing data from delimited files
The Delimited File Import ![]() action allows you to import data from a local or network delimited file into a new or existing table. If using an existing table as the output, use field mapping to map output fields to the existing table structure. You can also configure a failure table to capture records that do not successfully import into the target table. You can:
action allows you to import data from a local or network delimited file into a new or existing table. If using an existing table as the output, use field mapping to map output fields to the existing table structure. You can also configure a failure table to capture records that do not successfully import into the target table. You can:
- Import from local or network file
- When using an existing table as the output, use field mapping to map output fields to the existing table structure.
- Configure a failure table to capture records that do not successfully import into the target table
-
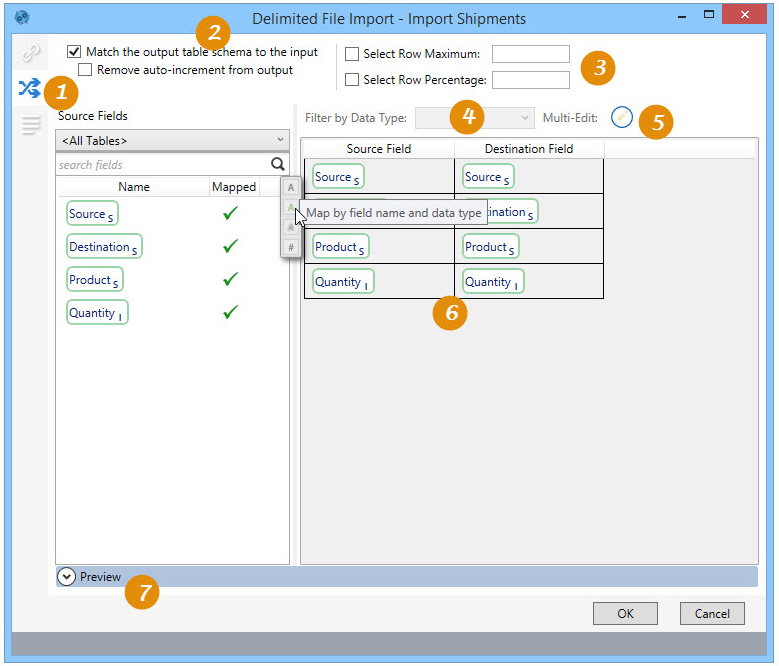
Use the Mapping tab to define mapping between input and output schemas.
-
Select the Match checkbox to map the output table schema to the input table.
-
Set limits on the imported records.
-
Filter displayed mappings by data type.
-
Use the Multi-Edit option to edit properties of multiple selected fields simultaneously.
-
Review the mapped fields.
-
Preview resulting filtered data or SQL statement.
The most common application is to import data from an existing delimited file source.
Import from a delimited file
- Drag the Delimited File Import icon onto the design surface.
-
On the Connections tab
 , enter a Name and a Description to identify the action, then specify the input delimited file and output database table options:
Input -
- For Delimited File Connection, select the .txt or .csv file from which the data is being imported, or choose New Delimited File Connection to establish a new connection to another delimited file.
Output -
- For Database Connection, specify the database to which the data is being imported, then enter or select a Table Name depending on the Output Mode you choose -
- For Create/overwrite a table, enter the name of the table being created or overwritten.
- For Use an existing table, select the table to be used from the drop-down. Note that you may be required to map data columns if the input and output schemas are different.
- You can also create an output table containing those records that do not import successfully. To do this, select the Failure Table Name checkbox, and either enter a name for the table or accept the default name, which is based on the name of the output table and appended with _Failures. Failed records, if encountered, are written to the table as is, and must be resolved manually.
- On the Mapping tab
 , indicate how the data is mapped between the input delimited file and output database table. Refer to Field Mapping for more information.
 - If enabled in User Preferences, use the Performance tab
 to change certain execution settings specific to the action. Refer to Change general preferences for additional information.
Last modified: Thursday December 19, 2024