Creating joins
Joins enable you to establish relationships between tables in order to minimize redundant data. You can use them to return records from two tables that are joined by one or more columns with the same name and values. Joins that group more than two columns are called compound joins.
You can create the following types of joins:
- Inner join
 — returns records where the values from both tables match.
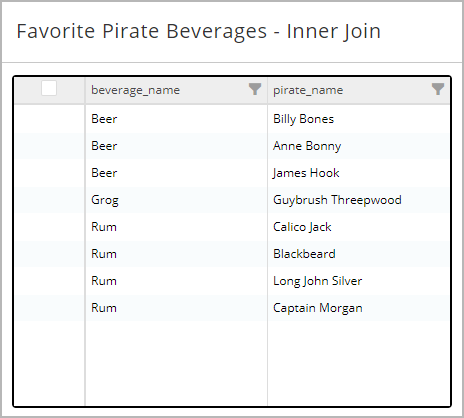
- Left outer join
 — returns all records from the first table and any matching records from the second table.
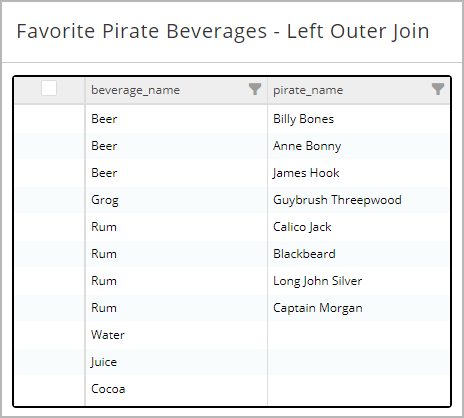
- Right outer join
 — returns all records from the second table and any matching records from the first table.
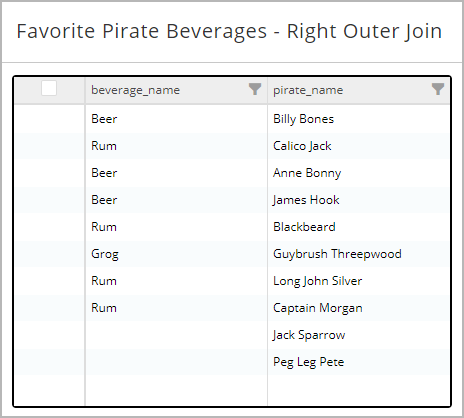
- On the Navigation bar, click Manage Manual Joins
 .
.
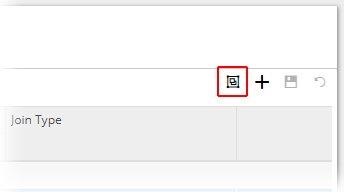
- On the Manage Manual Joins tab, in the upper right corner, click Add a row
 .
. - In the From section, specify the following:
- Connection Name — the connection that provides access to the table from which you want to create the first part of the join.
- Table Name — the table from which you want to obtain the field.
- Field Name — the field that you want to join with the other table.
- In the To section, specify the following:
- Connection Name — the connection that provides access to the table to which you want to create the first part of the join.
- Table Name — the table to which you want to add the field.
- Field Name — the field that you want to join with the other table.
- Specify the type of join. For Join Type, choose one of the following:
- Inner — returns records where the values from both tables match.
- Left Outer — returns all records from the first table and any matching records from the second table.
- Right Outer — returns all records from the second table and any matching records from the first table.
- If you want to save your changes, click Save changes
 .
.- If you need to cancel your changes, click Discard changes
 .
.
- If you need to cancel your changes, click Discard changes
- On the Navigation bar, click Manage Manual Joins.
- On the Manage Manual Joins grid, in the leftmost column, select the check boxes for two or more joins that you want to group.Each join that you want to group must have the same From and To table names.
- In the upper right corner of the grid, click the group button.
- In the Join Group Name dialog box, type a name for the group.
- Click OK.
The group is created.
- On the Navigation bar, click Manage Manual Joins.
- In the list, identify the join that you want to edit.
- Click any of the fields and adjust the join definition as necessary.
- Click Save changes.
- On the Navigation bar, click Manage Manual Joins.
- On the Manage Manual Joins page, select the join whose connections you want to view.
The joins for that connection are displayed on the design surface.
- On the Navigation bar, click Manage Manual Joins .
- On the Manage Manual Joins page, double click in the Field Name column for the table you want to view.
The table's fields are displayed.
Use this procedure for widgets, and for macros if joins have not been defined within the action. If you have created a join from within the action, see Access a visual join from the Statement Editor.
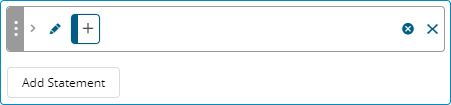
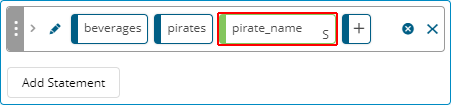
- In the Statement Editor, click Add Statement.

A blank statement ribbon is displayed.
- Click
 , and specify the first table in the join.
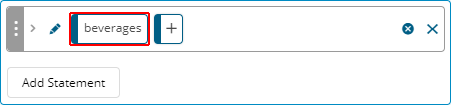
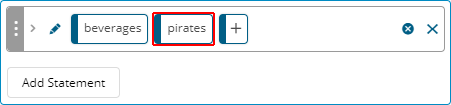
- Click , and specify the second table.
- Click the next , and specify a field.
- If necessary, add further statements to the query to include additional fields.
 Fields available for selection from a join are always from the second table specified in a statement. To include fields from both of the tables that make up a join, create additional statements.
- On the Navigation bar, click Manage Manual Joins.
- Do either of the following:
 Delete one or more joins
- For each join that you want to delete, on the right side of the Manage Manual Joins grid, click Delete.
Delete a group- For each join that is part of the group, on the left side of the Manage Manual Joins grid, select the check box.
- In the upper right corner of the grid, click the ungroup button.
- In the Join Group Name dialog box, clear the group name from the field.
- Click OK.
- In the upper right corner of the grid, click Save changes.
Last modified: Friday May 12, 2023