Creating scenario items
Each scenario item represents one change to be applied to the baseline scenario. For example, one scenario item may exclude a set of sites from consideration, and another scenario item may limit transportation policies to those less than 500 miles. Once a scenario item is defined, it can be used in multiple scenarios.
When you run a scenario, the items are processed in the order in which they are listed within the scenario definition. You can reorder scenario items on the item manager by dragging and dropping.
Item manager
The item manager enables you to create and modify the individual scenario items you define.
- Select Scenario Items
 in the left navigation panel or select New Scenario Item when editing a scenario definition.
 - Click New Scenario Item and enter the name for the item. By default, the name is “Scenario Item” for the first item definition, “Scenario Item (1)” for the second definition, and so on. You can change the name as desired.
- Select the Table containing the field you want to update for the scenario item. You can enter search criteria to limit the list of input tables displayed in the drop-down list.
- Optionally, select an existing filter from the selected table or click Create Filter.
If you are creating a filter:
- Define the filter criteria in the filter row of the table.
- Click Save, then enter the name for the filter and click Apply.
- Close the filter fly-out.
You can also use Edit Filter to edit the selection criteria for an existing filter definition. For more information about creating and editing filters, see Filtering table data.
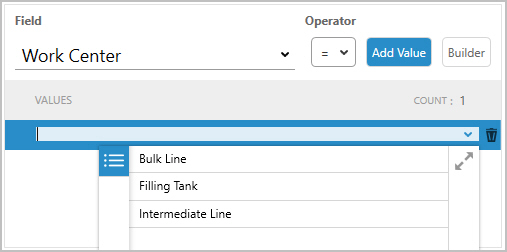
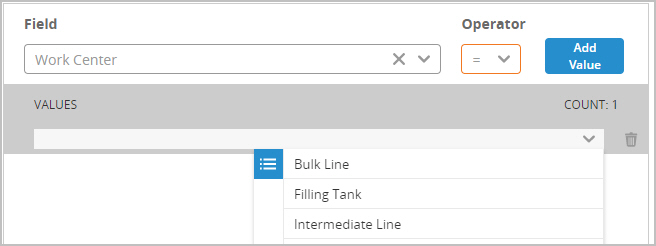
- Select the Field that you want to update for the scenario item. You can enter search criteria to limit the list of fields displayed in the drop-down list.
- Select the Operator.
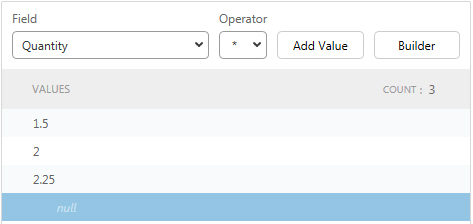
- Select or enter the Values to be assigned to the field. If a field has a set of acceptable values, these are displayed in a dropdown list.
You can enter values directly in each new values row, or use Add Value to add new value rows. Within this step, you can enter a set of values for use in updating the field. This method enables you to perform sensitivity analysis. For example, in the image below, there are 3 sub-scenarios. The field is multiplied by 1.5 in the first, then by 2 and finally by 2.25:
See Sub-scenarios for additional information about working with sub-scenarios.
Optionally, you can click Builder and use the scenario values builder to define values for the scenario item. Refer to Scenario values builder for additional information.
-
If a field has a set of acceptable values, these are displayed in a dropdown list.
- Repeat the steps described above to create additional scenario items.
Groups with scenario items
The scenario item manager does not currently support the ability to use groups as values and specify "Each" or "All". If the value includes both the group name and the "Each"/"All" value, such as "(ALL_Products) (Each)", the scenario item is considered invalid and will not be included when you run a scenario that includes this item.
If you want to apply a group using the "Each" method, the value must be the group name without the group method. When selecting the group name, double-click to add it without selecting "Each". During input file generation, the group is expanded with a record for each group member.
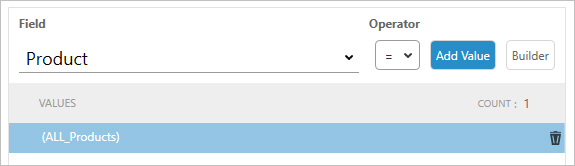
At this time, there is no way to create a scenario item using a group name with the "All" method.
Scenario values builder
You can use the scenario values builder to create one or more values for use with the scenario item. For example, assume that you want to test what happens when your demand quantity is increased in increments of 5 from 10 to 30.
- In the scenario items builder, enter the Minimum and Maximum values to be used.
- Enter the Step by which the values are incremented, then click Add Values. The values are added and selected by default.
- For example, a Minimum of 10 and Maximum of 30 with Step of 5 results in values of 10, 15, 20, 25, and 30.
- Optionally uncheck values that you do not want to use at this time, or uncheck the Select All checkbox to uncheck all values.
- If you want to remove defined values from the Values list box, click Remove Unchecked.
- Click Save when the definition of values is complete.
- The values are populated in the item manager. You can edit or delete individual values as required.
Last modified: Wednesday May 15, 2024