Appending records from multiple tables
The Table Union ![]() action allows you to append two or more input tables together into a single unified output record set. You can:
action allows you to append two or more input tables together into a single unified output record set. You can:
- Simultaneously map fields together to define the structure of a new output record set
- When using an existing table as the output, use table mapping to map action output fields to the existing table structure

On the Configuration tab:
-
Select the table(s) for the field list.
-
Search fields and sort by column headings to control display of the field list.
-
Drag or click individual fields from the list to create output.
-
Use the icons to quickly add all unmapped or duplicate fields, or clear all mapping.
-
Drag input table fields up and down to create the mapping.
-
Edit the output fields as necessary, or remove them from the mapping.
-
Clear single mappings as necessary.
The most common application is to merge records from multiple tables to create a "master" table.
Create a table union
- Drag the Table Union icon onto the design surface.
- On the Connections
 tab, enter a Name and a Description to identify this transform, then specify the input tables and output table for the union:
Input -
- For Database Connection, select the database from which the tables originate, or choose New Database Connection to establish a new connection to another database.
- Table Name – Select the tables to be included in the union. As each table is selected, it is added to the list below.
- To remove a table from the list, select it and click the Delete icon next to the list.
Output -
- The Database Connection reflects the database to which the records satisfying the match criteria are being written.
- Enter or select the Table Name depending on the Output Mode you choose -
- For Create/overwrite a table, enter the name of the table being created or overwritten. Using this mode, you can also choose to -
- Add a new _autokey field to the table, with incremented values that make each table row unique. This is required by some database types.
- Indicate that the table should be deleted after the macro or workflow has executed.
- For Use an existing table, select the table to be used from the drop-down, and indicate whether the rows in the table should be deleted before the new data is written to the table.
- For Create/overwrite a table, enter the name of the table being created or overwritten. Using this mode, you can also choose to -
- On the Configuration tab
 :
:
- Begin by assembling a list of candidate fields in the column on the left. Initially, all fields for all tables are listed, with a count of the tables containing each field appearing next to the field name. Use the tools above to list to tailor the list as necessary -
- Use the drop-down list to choose a specific table, or keep the <All Tables> selection.
- Use the column headings to sort the list by number of occurrences or alphabetically.
- Use the Search feature to filter the list by one or more common characters.
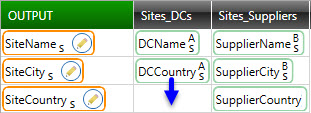
- Drag fields from the list to the OUTPUT area. As each field is added to the output, it also appears in the list of the table(s) from which it originates.
- Alternatively, use Add All or Add Multiples to quickly add all unmapped fields or all duplicate fields.
- Create mappings by dragging fields up and down each table list, matching fields by placing them in the same row.
- Use Clear Mappings to remove all mappings in the OUTPUT area.
- You can make changes to fields in the table lists or in the OUTPUT area -
- To clear the mapping for a field from a specific input table, hover over the right side of a field in the table’s list to enable the Delete icon
 , then click on the icon. This removes the mapping of this field in this table from the output.
 - To change the name or other properties of an output field, hover over the field in the OUTPUT list, and click the Edit icon
 , then make your changes.
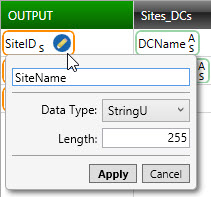
- To remove a field entirely from the mapping, hover over the field in the OUTPUT list, and click the Remove icon
 .
. - Click on a column header in the Output table to sort the output by that column.
- To clear the mapping for a field from a specific input table, hover over the right side of a field in the table’s list to enable the Delete icon
- Sometimes, fields can be incorrectly mapped. For example, fields with the same name might be mapped together although they contain contain completely different data. You can “split out” a previously mapped field into a new output field, as shown in another example -
- First, use the Edit icon
 to rename the existing output field in the OUTPUT list.
 - Drag the mapped field to be split into the blank row at the bottom of the OUTPUT list.
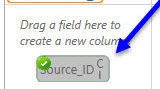
- Edit the newly created output field as necessary.
- First, use the Edit icon
- Begin by assembling a list of candidate fields in the column on the left. Initially, all fields for all tables are listed, with a count of the tables containing each field appearing next to the field name. Use the tools above to list to tailor the list as necessary -
- When using an existing table for the output, use the Mapping tab
 , to map the output fields to an existing table structure. Refer to Field Mapping for more information.
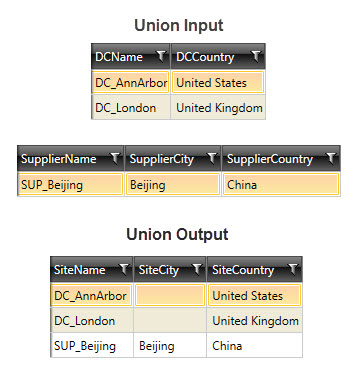
Table Union data example
In the following example, a master table is created that includes both distribution centers and suppliers. Mapping is used to correctly merge fields with similar properties.
Last modified: Thursday December 19, 2024