Importing multiple Excel worksheets or named ranges
The Excel Multi-Sheet Import ![]() action allows you to import data from multiple worksheets and/or named ranges in an Excel file using just one instance of the action. A new table is created for each worksheet and/or named range. You can:
action allows you to import data from multiple worksheets and/or named ranges in an Excel file using just one instance of the action. A new table is created for each worksheet and/or named range. You can:
- Choose which worksheets to import
- Import worksheets into separate tables or a common table -
- Import worksheets with different formats into separate tables
- Import worksheets with same format into the same table or separate tables
- Assign a common prefix and/or extension to all tables created
On the Connections tab:
-
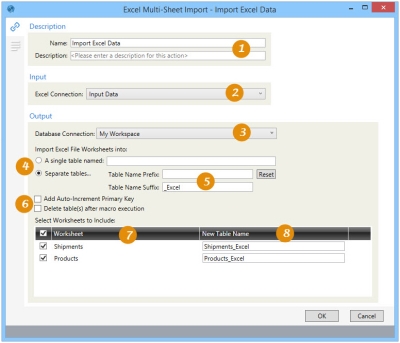
Enter a name and a description.
-
Select the input connection.
-
Select the output connection.
-
Indicate the import option: either single table or separate tables.
-
Specify an optional prefix and optional suffix for the new table names.
-
Optionally, add an auto-increment key to output tables and/or delete tables after execution.
-
Choose the worksheets to be imported.
-
Enter the new table names.
The most common application is to import data stored in Excel spreadsheets and named ranges.
Import multiple Excel worksheets or named ranges
- Drag the Excel Multi-Sheet Import icon onto the design surface.
- On the Connections tab
 , enter a Name and a Description to identify the action, then specify the input Excel worksheet and output database table options:
Input -
- For Excel Connection, specify the Excel file from which the worksheets are being imported, or choose New Excel Connection to establish a new connection.
Output -
- For Database Connection, specify the database to which the data is being imported.
- Indicate whether to import the worksheets into a single table or separate tables for each worksheet -
- If the worksheets you are importing have matching data schemas, and you want to import them into a single table, select A Single Table named and then specify the name of the table.
- To import each worksheet into a separate table, select Separate Tables.
- Specify a Table Name Prefix and Table Name Suffix for the new tables.
- Use Reset to return any manually-modified New Table name back to its default value of Table Name Prefix + Worksheet + Table Name Suffix.
- If the worksheets you are importing have matching data schemas, and you want to import them into a single table, select A Single Table named and then specify the name of the table.
- Indicate whether to include an auto-increment primary key in each output table.
- Indicate whether the output tables should be deleted following successful execution of the macro containing the import action.
- Select the worksheets to be imported. You can select the checkbox above the list of available worksheets to select the entire list, or you can select them individually.
- If you are importing into a single table, the New Table fields are filled in automatically and cannot be changed individually.
- If you are importing into separate tables, the New Table fields are filled in with the original worksheet name plus the prefix and suffix you specify.
- If enabled in User Preferences, use the Performance tab
 to change certain execution settings specific to this action. Refer to Change general preferences for additional information.
Last modified: Thursday December 19, 2024

