Managing assets
Use the Data Management page to manage your models, databases, and related files. You can also view data from any user-defined database (UDDB) or decision data model (DDM).
Supported file types
| File types you can upload |
|---|
| Supply Chain Guru X models (SCGM) |
| SQL Server databases (MDF) |
| Text files (TXT) |
| Comma separated value files (CSV) |
| Microsoft Excel 97 and Excel 2003 files (XLS) |
| Microsoft Excel 2007 and later files (XLSX) |
| Data Guru projects (DGPROJ) |
| Images (JPG, PNG, GIF) |
| File types you can create |
|---|
| Modeler models |
| SQL Server databases |
| Decision Data Model files (management restricted to admin-level roles) |
| Demand Modeler databases |
Access the Data Management page
In the upper left corner of the Supply Chain home page, click Data Management to display the following:
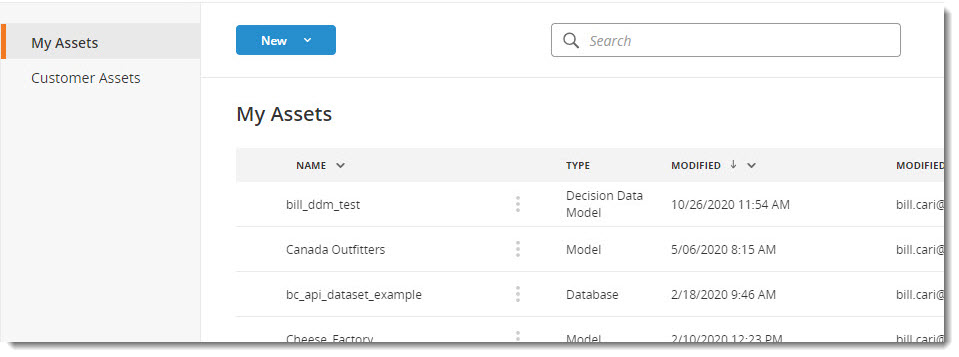
The Data Management page lists the assets owned by you or shared with you, and the following information is displayed for each asset in the list.
- Name - The name of the asset.
- Type - The type of asset; for example, Model, Database, XLSX, TXT, Image, and so on.
- Size - The physical size of the asset. Use Refresh Asset Size on the kebab menu to have the size recalculated. When downloading an asset, the actual size is likely to be smaller than the value reported in Data Management.
- Modified - The data and time the asset was last modified. The default is the date and time the asset was created or uploaded, and this value only changes if the asset is replaced or renamed from within the Data Management page.
- Modified By - The user who last modified the asset.
- Created Date - The date and time the asset was originally created or upload.
- Owner - The user who owns the asset.
You can adjust the column widths as needed to review the data in the grid.
Search for assets
You can filter assets using one or more columns in the Data Management table. The table provides two types of filters that can be combined to narrow your search:
-
Search – Use the Search function to define filter criteria.
-
Quick filters – The Type, Modified by and Owner columns provide a quick filter that lists the valid values for the column.
Using search features
There are specific operators available depending on the data type of the column you are filtering.
-
If you are using the default operator (Contains for string columns, Equals for dates and numbers), enter or select the filter value.
-
For other operators, click the search icon to display the list of available operators for the column, then select the operator.
-
Enter or select the filter value. When using the Between operator, you must provide two values.
-
Reset clears the filter value for the selected column.
String operators
-
Contains – The column value must contain the filter value. This is the default filter behavior if you do not select an operator.
-
Does not contain – The column value must not contain the filter value.
-
Starts with – The column value must start with the filter value.
-
Ends with – The column value must end with the filter value.
-
Equals – The column value must be equal to the filter value.
-
Does not equal – The column value does not equal the filter value.
Date and Number operators
A calendar tool is displayed when you are filtering date columns.
-
Equals – The column value must be equal to the filter value. This is the default filter behavior if you do not select an operator.
-
Does not equal – The column value must not equal the filter value.
-
Less than – The column value must be less than the filter value.
-
Greater than – The column value must be greater than the filter value.
-
Less than or equal to – The column value must be less than or equal to the filter value.
-
Greater than or equal to - The column value must be greater than or equal to the filter value.
-
Between – The column value must be between the two filter values. You will provide two distinct values.
Using quick filters
-
Click the filter icon in the column heading for Type, Modified by or Owner.
-
Optionally, use the Search function to limit the list of values.
-
Select one or more values or click Select All.
-
You can click Select All twice to clear the quick filter without searching for individual users.
-
Click OK.
Clearing filters
Select the Reset option to clear individual searches or click Clear Filters to clear all filters.
Last modified: Friday May 12, 2023