Design a macro
Macros enable you to create a repeatable execution sequence for your actions that automatically documents new actions as they are added. For example, you can create a simple macro that imports data from one data source, then aggregates the data, and exports it to a database that can then be used in a program such as Supply Chain Guru.
Or, you can build more complex macros that include branch or merge points for more complex execution schemes.
You build a macro by dragging and dropping actions onto the design surface. The actions you drop are used for importing or exporting data, transforming data, or logic control. You can add actions that you have already created by choosing them from the Actions pane, or you can add new actions from the Actions palette and define them as you drop them into the macro.
- Do one of the following -
- Select Actions > New Macro from the menu bar.
- On the Actions pane, right-click on Macros, and then select New Macro.
- Select the New Macro icon
 from the Menu Bar.
The window for creating a macro displays, with the Configuration tab selected.
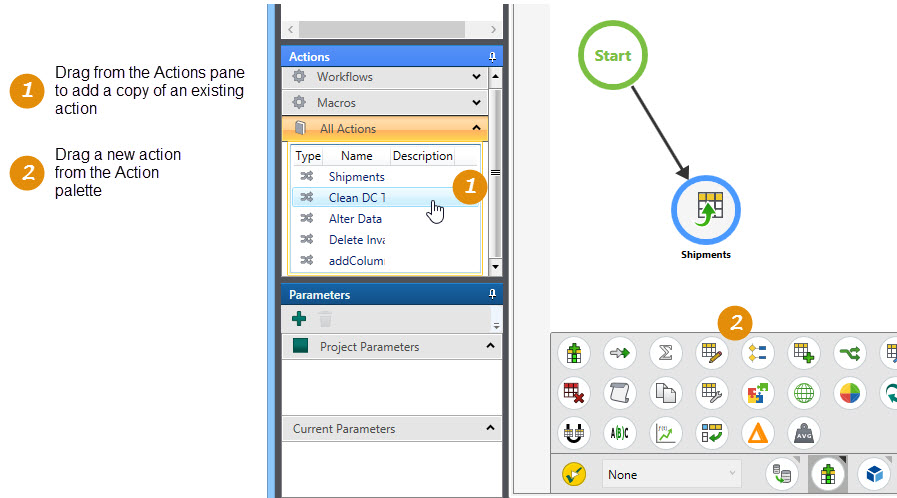
- Begin the macro by adding an action using one of the following methods -
- Existing action
- In the Actions pane, locate the action you want to add.
- Drag and drop the action onto the Start icon in the design surface.
- New action
- Select an action from the Actions Palette to display its submenu, then click and drag an action from the submenu to the Start icon in the design surface.

A dialog box for the action displays, the contents of which depend on the action you are adding.
- Enter or select the appropriate information in the dialog, and click OK.
- Drag and drop another action, either onto the Start icon or the one already in the design surface.
- For a new action, enter or select the necessary information in the dialog, and click OK.
If you drop the action on one that is already in the design surface, it is automatically linked to that action.
- Add subsequent actions in the same manner. To move an action in the diagram, click and drag it to a new location.
- To save the macro, click the Save icon on the ribbon.
As you build your macro, use the toolbar at the bottom of the window to manipulate the display of the macro diagram and control its execution.
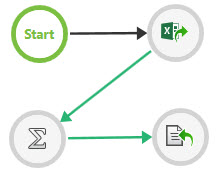
When you add an action to a macro, a link is created between the action you are adding and the action (or Start icon) on which you dropped it. This link displays differently depending on the nature of the relationship between the two actions. Links indicate the direction of the flow of control.
Links appear in one of two line styles:
- Solid line
 indicates the path that is always executed if no errors are encountered. Solid lines only appear when the workflow originates at the START icon.
 - Dashed line
 indicates a path whose flow depends on conditional logic, such as the flow out of a conditional logic action, or a path that is not connected to the START icon.
The color of the line, whether dashed or solid, is indicative of the status of the link:
- Green
 indicates that the downstream action to which it is attached uses the output of the upstream action to which it is attached. These are referred to as data flow links. In a logic control action, this line also represents the pass branch.
 - Red
 indicates the flow of a fail branch of a logic control action.
 - Black
 indicates that the downstream action to which it is attached does not use the output of the upstream action to which it is attached. These are referred to as sequence links.
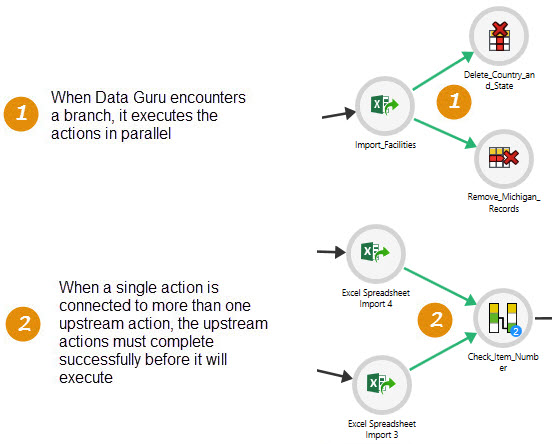
When you execute a macro, you execute all the actions linked to the Start icon. The execution order of the actions is based on their position within the flow of the diagram. Each action can only execute when the input or condition it requires has been provided.
As with workflows, you must save a macro before executing it.
To run a macro, make sure it is displayed in the work surface, then click the Execute icon on the ribbon.file:
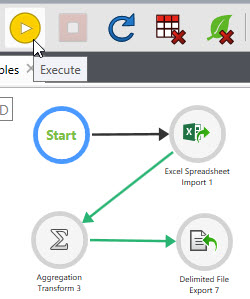
As the macro executes, the tab identifying macro turns blue, and the status of each action is indicated by “badges” on the corner of the action’s icon. You can display a legend describing these badges by clicking on the Legend button.
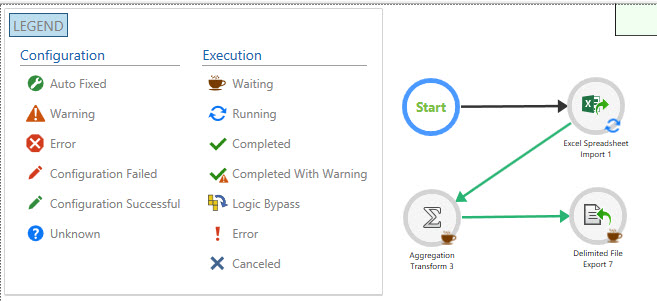
The legend includes the badges representing both Configuration and Execution status. To view more information on the badges displayed for an action, hover over the action to display the radial menu, then hover over the status area on the menu.
The power of macros is not just due to their sophistication, but also to their portability. When multiple users are assigned to the same project, they can import and export macros to combine their work. Macros are exported to a file of type .dglib (Data Guru Library file), which can then be imported back into the same project or even another project. When a macro is imported or exported, only its definition is transferred, and not the underlying data to which the connection refers.
Export macros
A macro does not have to be open to be exported. You can also export multiple macros simultaneously.
- Select Actions > Export Macros from the menu bar to open the Export Macros screen.
- Indicate the macros to be exported by moving them from the Available Macros area to the Macros to Export area.
- To move a single macro, click on it, and then click on the single arrow icon pointing in the direction you want the macro moved.
- To select multiple macros, press and hold the Ctrl key as you click on each macro.
- To move all macros, click the double arrow icon pointing in the direction you want the macros moved.
- In the Export To field, specify the name and location of the file to which the macro(s) will be exported. You can type the path and filename directly in the field or use the browse icon to locate an existing file. Data Guru automatically appends .dglib to the filename.
- Click OK to export the macros you have selected.

Macros are exported based on their state from the last save, so if you are exporting a macro that is currently open, you must first save it to capture any changes made since opening it.
Import macros
Macros can be imported into the project that is currently open. You can import more than one macro simultaneously.
To import one or more macros:
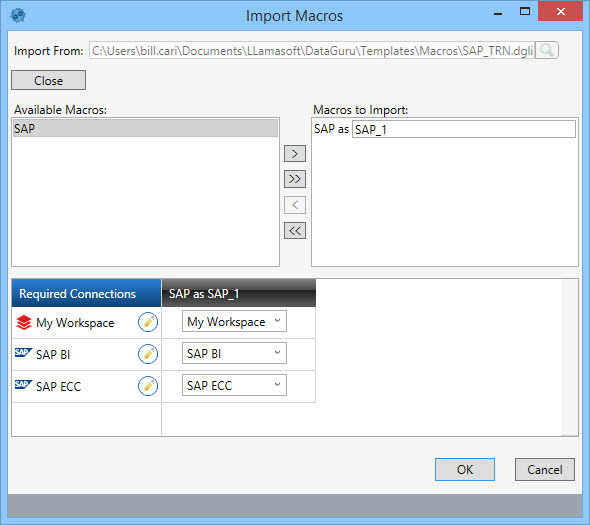
- Select Actions > Import Macros from the menu bar to open the Import Macros screen.
- In the Import From field, specify the name and location of the .dglib file from which the macro(s) will be imported. You can type the path and filename directly in the field and then click the Open button, or use the browse icon to locate and select the file, in which case it is opened automatically.
- Indicate the macros to be imported by moving them from the Available Macros area to the Macros to Import area.
- To move a single macro, click on it, and then click on the single arrow icon pointing in the direction you want the macro moved.
- To select multiple macros, press and hold the Ctrl key as you click on each macro.
- To move all macros at once, click the double arrow icon pointing in the direction you want the macros moved.
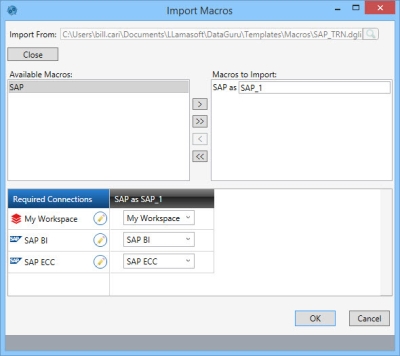
- In the Connection Mappings area at the bottom of the screen, make any changes to the connection mappings of the macro(s) being imported.
- The first column lists the connections required by the macro.
- The second column represents connection mappings for the first macro you are importing.
- Additional columns, when included, represent connection mappings for additional macros you are importing.
- In icon appearing next to a table name indicates a connection that already exists in the current project, which is the project into which the new macros are being imported.
Global mappings are only set if all macros being imported map the connection in the same manner. To assign all mappings globally, click the Edit icon next to the connection, then select a global mapping from the drop-down list, and click Apply.
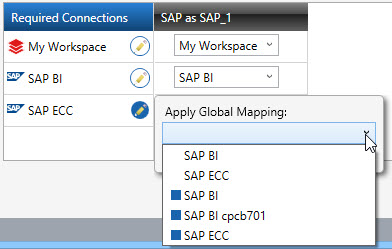
Changing the mapping to global mapping sets all the mapping for the corresponding connections of the macros being imported to the same value.
- Click OK to import the selected macros using the mappings you have specified.
Last modified: Thursday December 19, 2024