Disaggregating data
The Disaggregation ![]() action allows you to separate a value downward in a hierarchy, disassembling data that has previously been aggregated together. You can
action allows you to separate a value downward in a hierarchy, disassembling data that has previously been aggregated together. You can
- Drill down a data item in a hierarchy to multiple levels, and generate a disaggregated result set for each level
- Perform time disaggregation using different time drill-down options
- Capture seasonality in your drill-down analysis using time-based disaggregation
On the Configuration tab:
-
Map aggregated data to hierarchy weights.
-
Use the Table Fields to select fields for aggregated forecast data and hierarchy levels.
-
Use Required Fields to define the fields for aggregated total, weighted percentage of total, and hierarchy level.
-
Use Hierarchy Levels to define the allocation hierarchy levels and to identify output.
-
Use Group By Fields to segment the output based on mapped input fields that are not in the hierarchy.
-
Use Pass Through Fields to identify input fields to include in the output without affecting segmentation.
-
Define the time series settings for existing and new buckets.
-
Optionally select time-based disaggregation for smaller buckets.
Possible applications include:
- Aggregate demand data from SKU level to a higher level in the hierarchy to perform demand analysis and forecasting at that level. Use disaggregation to disaggregate the resulting forecast back to SKU level.
- Aggregate products to a higher level in the hierarchy to simplify your Supply Chain Guru model. Use Disaggregation after running your model to disaggregate the outputs back to SKU level.
Disaggregate data to a more granular level
- Drag the Disaggregation icon onto the design surface.
-
On the Connections tab
 , enter a Name and a Description to identify the action, then specify the input and output data sources:
Input -
- Database Connection – Select the connection to the database containing the table(s) with data to be aggregated, or choose New Database Connection to establish a new connection to another database containing the table(s).
- Table Name – Use the drop-down to select one or more tables containing the data to be aggregated.
To remove a table from the list of selected tables, highlight the table name, and click the Remove icon
 .
. - For Input Table, select the table containing the input data being disaggregated.
- For Hierarchy Table with Weight, choose the table that contains the quantity proportions for the hierarchy you are working with.
Output -
- The Database Connection indicates the database for the output tables.
- For Base Table Name, enter the prefix to be used for the various levels of output tables created based on selections in the Configuration tab.
- Indicate whether the table(s) should be deleted after the macro has executed.
- On the Configuration tab
 :
:
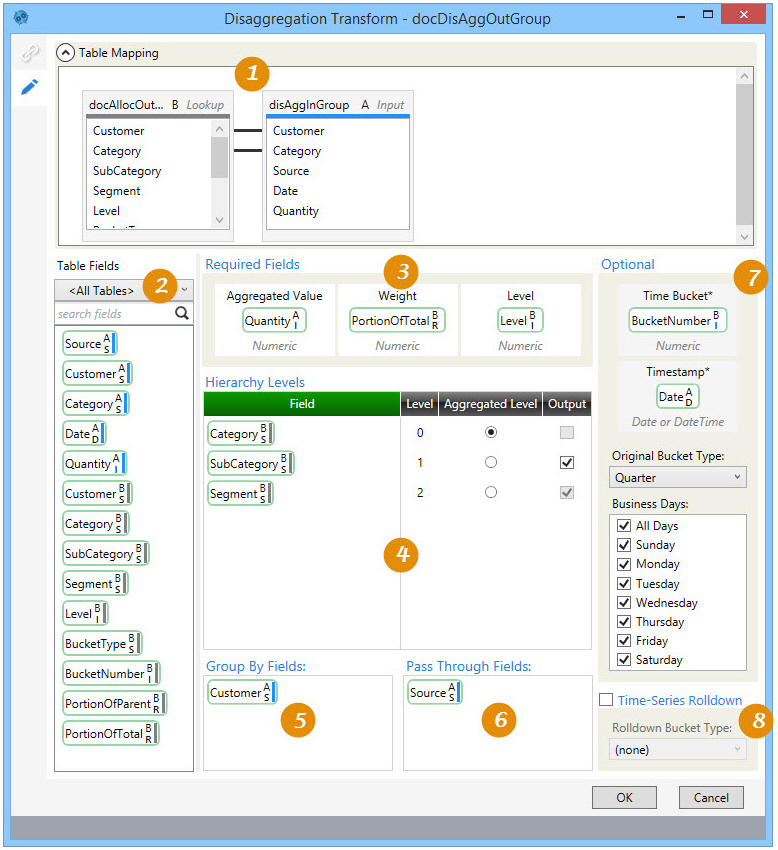
- Use the Table Mapping area to create relationships between the input table containing aggregated data and hierarchy table containing quantity proportions; that is, the results from the Allocation action.
While the actual steps you perform to create the mapping are the same as those discussed in Table Mapping using joins, the mapping you define here establishes relationships used to perform the disaggregation in this action.
- Drag from a field in one table “A” to a field in another table “B.” Repeat for all fields being mapped between the two tables.
- To remove the mapping between two fields, right click on the mapping line and select Remove, or left-click to highlight the line and press Delete.
- In the Required Fields area, identify the following -
- For Aggregated Value, specify the field that contains the aggregated quantity from the input table you are using in this action.
- For Weight, specify the field in the Hierarchy Table that indicates this record’s portion of the total.
- For Level, specify the field in the Hierarchy Table that indicates the level in the hierarchy of a record.
- For the Hierarchy Levels section, drag the field icon from the lookup table for each hierarchy field to be used from Table Fields into the Field column. Once placed into the hierarchy, drag an icon up or down to change its relative position in the order.
- Optionally, use Group By Fields to segment data by one or more input fields that are not included in the hierarchy. To do this, drag from the Input table fields. The fields you use must also be mapped to their respective fields in the hierarchy table (lookup table).
- Optionally, use Pass Through Fields to include in the output data one or more input fields that are not part of the hierarchy. These fields are passed through to the output and help associate the output record to the input record from which it was generated.
- Optionally, for time-based disaggregation -
- For Time Bucket, select the Lookup Table field representing the time bucket sequence number from Table Fields.
- For Timestamp, identify the date/time field used in the input table.
- For Original Bucket Type, select the bucket interval that is used in the lookup table. Note that this selection must match the bucket type that was used to generate the lookup table.
- Select the Business Days of the week to be considered in the data disaggregation.
- Optionally, for time series rolldown -
- Select Rolldown Bucket Type to break down the data to a more granular time level than the original level at which it was incremented.
- Choose the new increment; for example, instead of the original weekly bucket, choose Daily.
- Use the Table Mapping area to create relationships between the input table containing aggregated data and hierarchy table containing quantity proportions; that is, the results from the Allocation action.
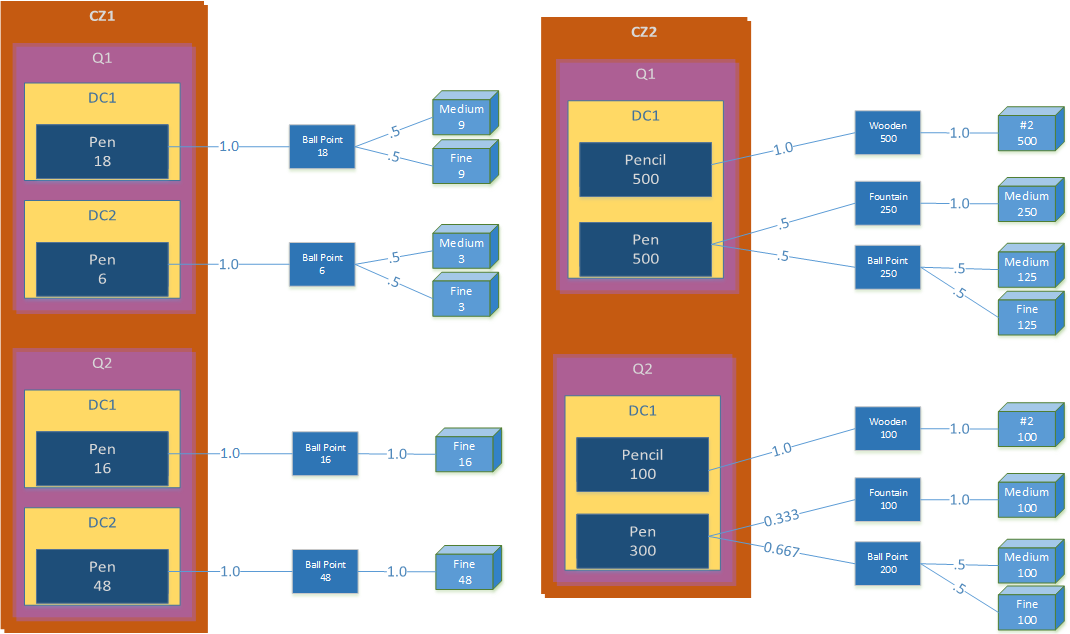
Disaggregation data example
In the following example, data for the Category field is disaggregated down two levels. A data analysis is also provided.
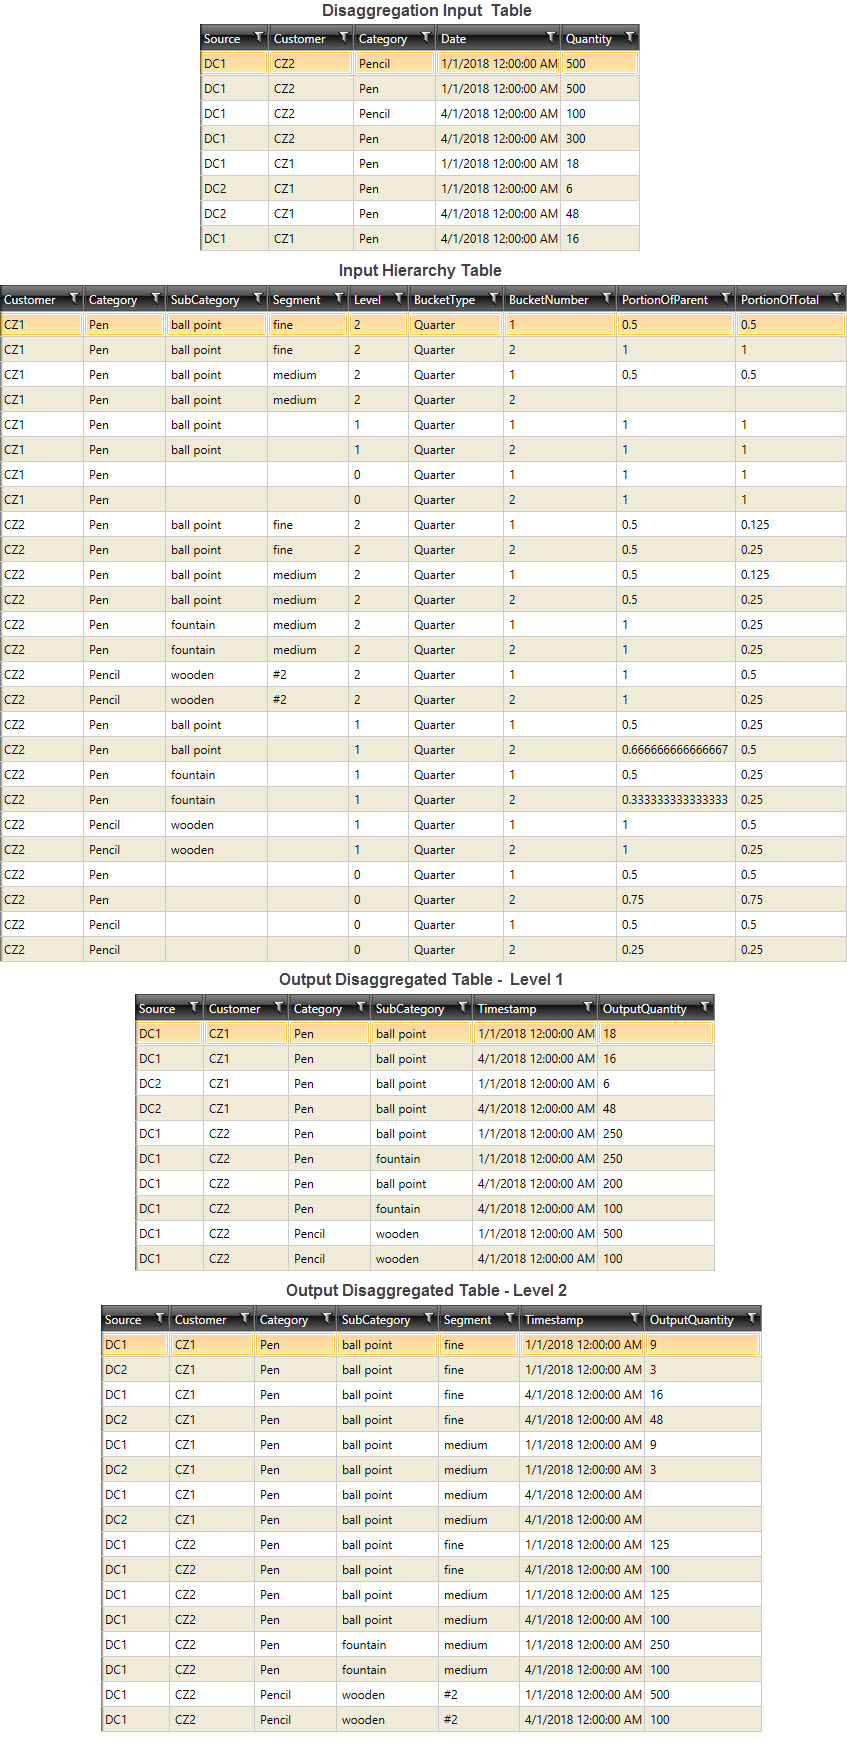
Data Analysis -
Last modified: Thursday December 19, 2024