Exporting data to delimited files
The Delimited File Export ![]() action allows you to write into a delimited file from a database table. You can include or exclude headers, the text identifier (if any), and the separator to be used. The exported file can be sorted by any field (or fields) in the exported table.
action allows you to write into a delimited file from a database table. You can include or exclude headers, the text identifier (if any), and the separator to be used. The exported file can be sorted by any field (or fields) in the exported table.
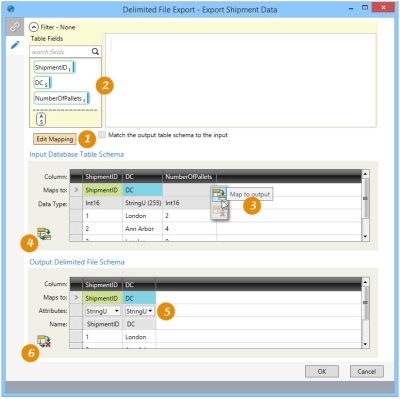
On the Configuration tab:
-
Define the mapping between input and output schemas, set the auto-increment option.
-
Drag table fields to create a filter for limiting exported records.
-
When Edit Mapping is enabled, use the Map to output option to map an individual column.
-
When Edit Mapping is enabled, use this option to add all unmapped columns.
-
For a delimited file, all fields are converted to text, so the data type cannot be changed.
-
When this option is enabled, use it to clear the mapping.
Export to a delimited file
- Drag the Delimited File Export icon onto the design surface.
-
On the Connections tab
 , enter a Name and a Description to identify the action, then specify the input database and output file options:
Input -
- Select the Database Connection, or choose New Database Connection to establish a new connection.
- For Table Name, select the name of the table being exported.
Output -
- Enter the File Path of the delimited file (or a parameter identifying the delimited file), or use the browse button to select a path.
- To include a date/timestamp postfix to the end of the output filename, select Append Postfix and choose either Date or DateTime.
Options -
- Select Exclude Headers to omit column headings from the output.
- Choose a method for identifying individual column values -
- In the Text Qualifier field, indicate an identifying character to be used to enclose each column value.
- Use the Field Delimiter choice to select or specify a character to be inserted between column values.
- Use the Sort By area to select a column with values to be used for sorting the output records. Click the up or down arrow immediately next to the selected column to sort records by ascending or descending order of the column’s values. You can select more than one column, and when more than one column is selected, use the up and down arrows to the far right of a column to change its relative placement in the sort order.
-
On the Mapping tab
 , indicate how the data will be mapped between the input database and output delimited file:
- Select Match the output table schema to the input if the input and output table columns are arranged in the same order, with the same number of columns and the same column names. If selected, then mapping cannot be edited.
The Remove auto-increment from output choice is available and enabled only if the match option is selected.
- Click Edit Mapping to display the schema for the input database table and output Excel file and, if necessary, make any necessary changes to the output Excel file. Several buttons are enabled -
- Click the button in the bottom left corner of the Input Database Table Schema area to add all unmapped columns to the output table if it does exist, or map all columns if the output table does not exist.
- Click the button in the bottom left corner of the Output Delimited File Schema to clear all mappings that have been applied on this tab.
- In the Input Database Table Schema, hover over an individual column in the Maps to row to display buttons for creating or clearing the mapping for just that column.
- In the Output Delimited File Schema, hover over an individual column in the Maps to row to display a button for clearing the mapping for just that column.
You cannot change the data type for fields in the output schema, as all fields are converted to text in a delimited file. - To more narrowly define the records for which the export applies, open the Filter area and build the necessary expression by dragging icons from the Table Fields area. Refer to Filters for more information.
- Select Match the output table schema to the input if the input and output table columns are arranged in the same order, with the same number of columns and the same column names. If selected, then mapping cannot be edited.
Last modified: Thursday December 19, 2024

