Allocating data by weight
The Allocation ![]() action allows you to calculate allocation weight and aggregate a single value for multiple hierarchy levels. You can:
action allows you to calculate allocation weight and aggregate a single value for multiple hierarchy levels. You can:
- Roll up hierarchical data to multiple levels and generate an aggregated result set for each level
- Perform time aggregation using different time roll up options
- Calculate proportional weights in a hierarchy for each parent-child combination
- Capture seasonality in transactional data by performing time-based allocation

On the Configuration tab:
-
Use Table Fields to locate all input and optional lookup table fields.
-
Use the Hierarchy Keys to define the mapping from the input table to the lookup table.
-
Use the Hierarchy Levels to define the weight hierarchy levels and output tables.
-
Use the Group By Fields to define the grouping for output.
-
Use the Measure Field to define the field being aggregated.
-
For time-based allocation, specify the date field to be used for aggregation.
-
Select the Time Bucket to define the time increments to which data is aggregated.
-
Select the Business Days to include in the aggregated data.
Possible applications include:
-
Capture hierarchical rates and seasonality from historical shipment data and use it to disaggregate an aggregated flow quantity to a more granular level; for example, disaggregate flow units from a product family level to a SKU level
- Understand distribution of demand for forecasting purposes
Allocate data
- Drag the Allocation icon onto the design surface.
-
On the Connections tab
 , enter a Name and a Description to identify the action, then specify the input and output tables and options:
Input -
- Database Connection – Select the connection to the database containing the data to be allocated, or choose New Database Connection to establish a new connection to another database containing the data.
- For Input Table Name, select the table containing the data to be allocated.
- Optionally, select Use Lookup Table and choose the table containing lookup values to be used.
Output -
- The Database Connection indicates the database for the allocation and aggregated data tables.
- For Allocation Table Name, specify the name of the table containing the hierarchical weights generated from the input data.
- For Base Aggregation Table Name, enter a prefix that will be applied to the tables created for each hierarchical level chosen in the Configuration tab.
- Indicate whether the tables should be deleted after the macro or workflow has executed.
- On the Configuration tab
 :
:- To define the hierarchy, drag the field icon for each hierarchy field from Table Fields into Hierarchy Levels. Once placed into the hierarchy, you can drag an icon up or down to change its position in the hierarchy order.
- If using a lookup table, map the input and lookup tables by dragging their appropriate key fields from Table Fields to the Input Key and Lookup Key fields in Hierarchy Keys.This area only appears if Use Lookup Table has been selected on the Connections tab.
- For Group By Fields, drag from Table Fields to identify the fields by which the data will be segmented in the output. You can use Input table and/or Lookup table fields.
- To define the Measure Field on which aggregation is based, drag the appropriate icon from Table Fields onto the Measure icon, or double-click on the icon and choose a valid field.
- For Time Based Allocation, drag from Table Fields to identify the Date field of the input table, then choose the Time Bucket increments to which data is to be aggregated, and select the Business Days for which data is to be aggregated.
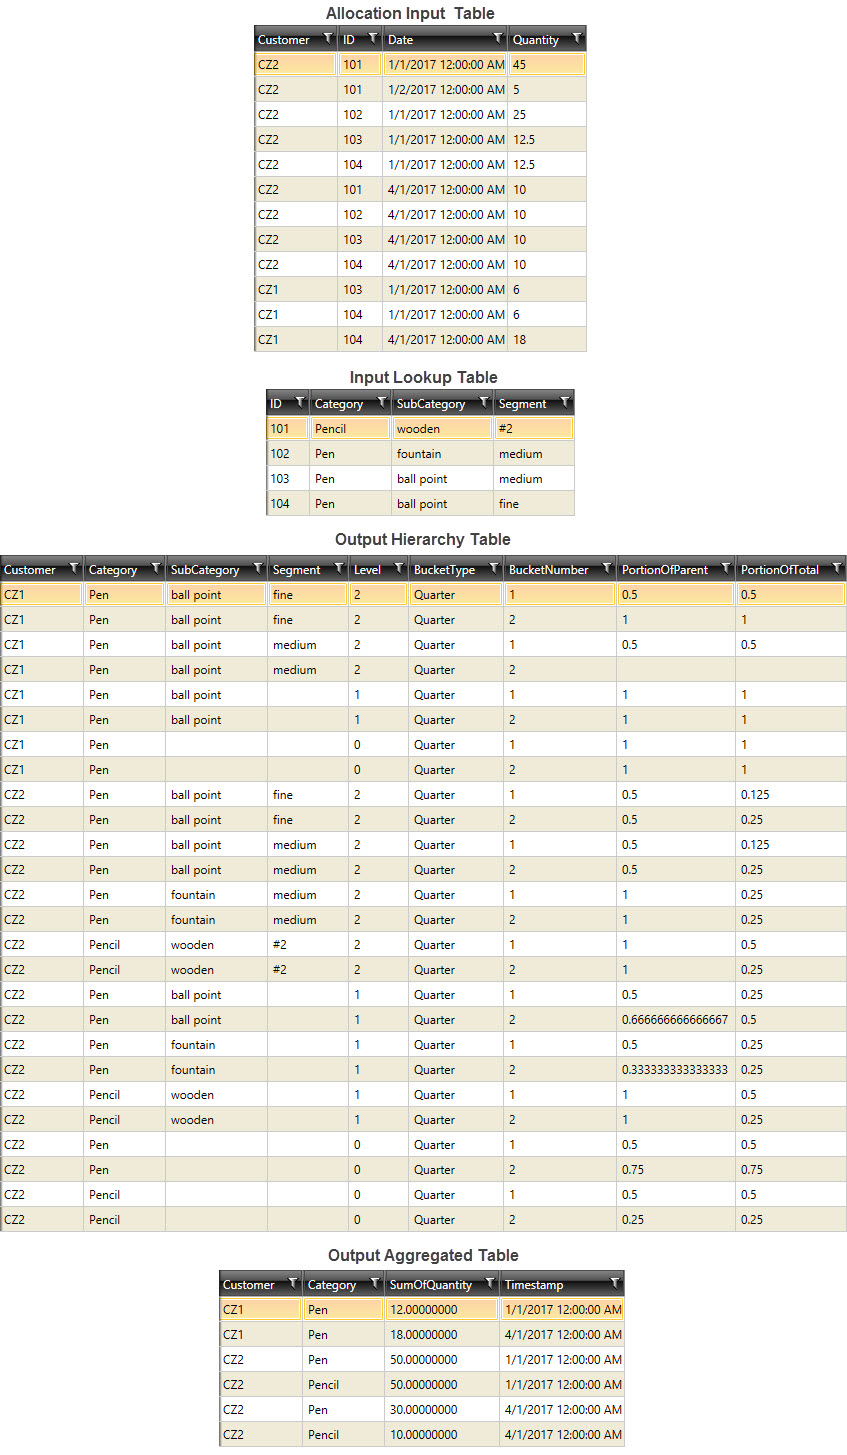
Allocation data example
In the following example, a lookup table is used to allocate weight based on values in the Quantity field of an input table:
Last modified: Thursday December 19, 2024